
Copyright
@2019, Techcombi Pte Ltd. All rights reserved. Smart RFID Inventory System User Manual – Version 1.01 This product and related documentation are protected by copyright and are distributed under licenses restricting their use, copying, distribution, and de-compilation. No part of this product or related documentation may be reproduced in any form by any means without prior written authorization of Techcombi Pte LtdTrademark
Smart RFID Inventory System is developed by Techcombi Pte Ltd. Other product names mentioned in this manual may be a trademark or registered trademarks of their respective companies and are hereby acknowledged.
“Find even more easy-to-use tools on inventory management, such as to stock taking for only minutes”
|
Section |
Description |
|
Chapter 1 |
System Overview: Overview on the Smart RFID Inventory management module, highlights features and defines terminology |
|
Chapter 2 |
Prerequisites: Describes procedures how to set up the master records. |
|
Chapter 3 |
Stock in: guides to create and maintain Materials and Products to receive and save into the warehouse |
|
Chapter 4 |
Stock out: guides to create and maintain Materials and Products to issue and sell |
|
Chapter 5 |
Inventory management: Describe and guide to do the inventory management |
|
Chapter 6 |
Handheld: Describe and guide to use the handheld to do the inventory management |
|
Chapter 7 |
Sample to stock in and stock out |
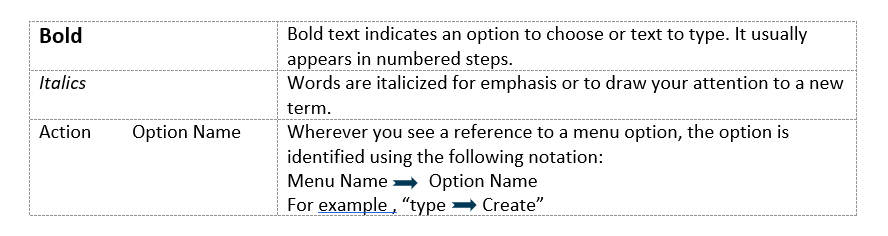 Icon Function
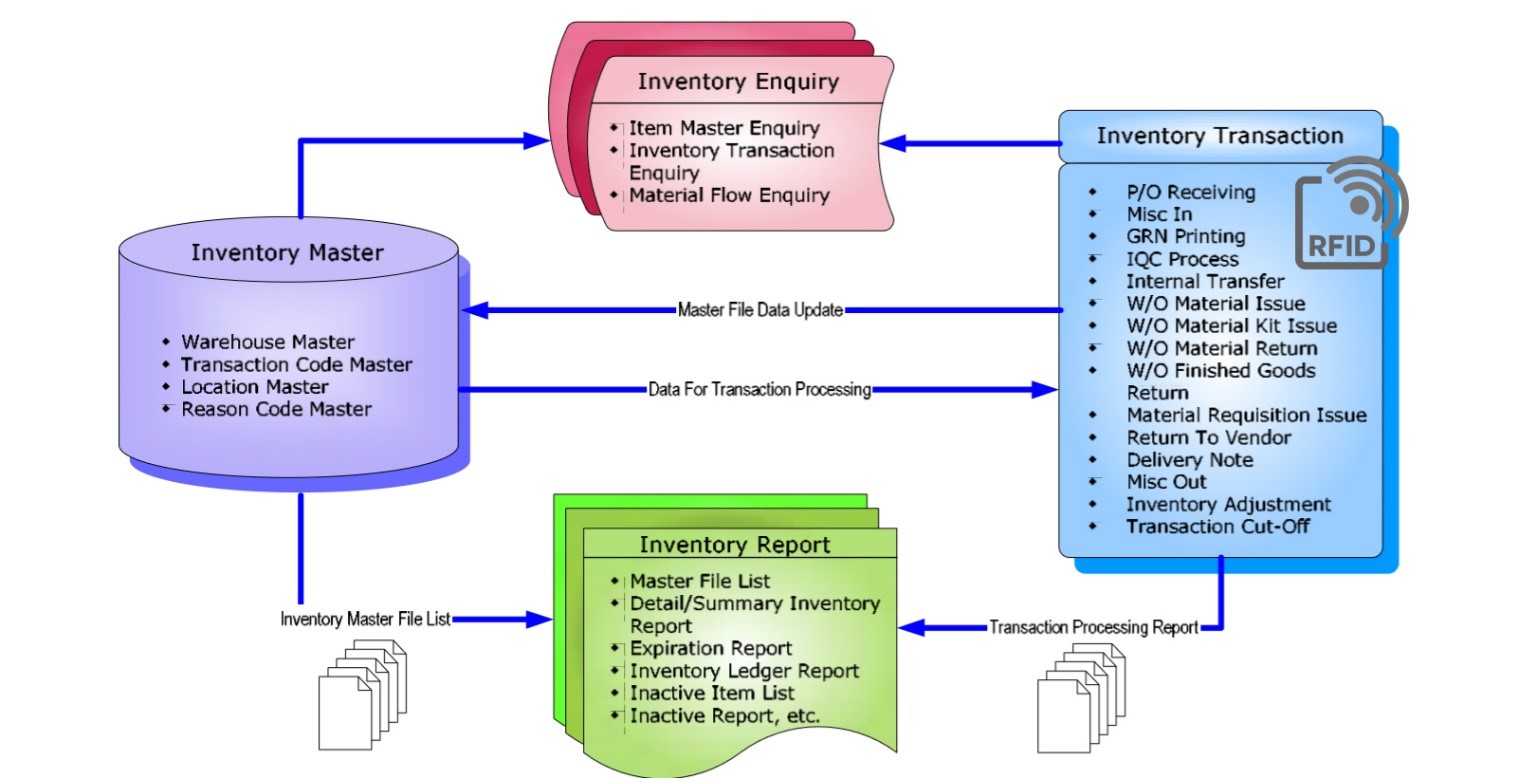
Inventory
Inventory is any stock at any stage in the supply chain. This includes finished goods, sub-assemblies, components, and raw materials. Inventory has an intrinsic value and incorporates added value. The investment in inventory typically represents one of the largest single areas of capital in a business, often more than 25 percent of total assets. Inventory should be an asset. However, if inventory is not properly managed, it can be a liability. Inventory Management provides the opportunity to save money by controlling inventory with informed planning and production.
Warehouse
A warehouse is a grouping of inventory locations or stocking positions. A warehouse may present a physical space or a logical condition for inventory. You define warehouse in the prerequisites. Multiple Warehouse Smart RFID Inventory Management System allows for as many warehouse as needed for any item. Each warehouse may be designated as allocable (allowed for order processing), or non-nettable (not used in the MRP netting logic). This allows business to set up staging areas and quarantined warehouse. The warehouses can be either physical or logical warehouses. • Physical warehouses and locations represent inventory at rest They describe the stock’s geographic location. Examples include a stockroom, warehouse, or storage facility. Physical warehouses can also describe consignment inventory and floor stock • Logical warehouse and locations represent inventory in motion They describe the condition of inventory, such as work-in-progress, goods-in-transit, and goods in inspection.
Location
A location is a physical or logical stocking position or area within a warehouse. Examples of physical areas are bins, rows, or floor locations. Examples of logical areas are quarantine, rework, and goods-in-transit. Multiple Locations The System allows for as many inventory locations as desired for any item
Lot
A lot is a particular batch of an item such as pharmaceuticals and other perishables. You define items as lot-controlled in the Item Master. To maintain lot-controlled items, you must input a lot number. Inquiry programs display the lot numbers. Transactions requiring a lot number entry are defined on the Transaction Maintenance program. When these transaction types are used for non lot-controlled items, the lot number validation is by-passed. Lot Inventory Detail prints a lot inventory detail report.
These features in The Smart RFID Inventory Management System enhance your overall production or distribution performance: ABC Classification Inventory Control, Cycle Counting, Physical Inventory, Alternate Items and multiple Item Unit of Measure.
ABC Classification
An ABC analysis separates inventory items into three groups according to their annual usage and cost.
A Typically, 80% of your inventory value is reflected in 20% of your total inventory. These are known as A items.
B 15% of your inventory value is reflected in 30% of your total inventory. These are known as B items
C 5% of your inventory value is reflected in 50% of your total inventory. These are known as C items.
An ABC analysis identifies items having the greatest impact on inventory performance when you implement improved inventory control. For example, a careful analysis of the order quantity and timing decisions for A items provides a larger benefit and possible improvement in inventory performance than do similar efforts on C items.
You assign an ABC code to each item, which supports ABC usage reporting and re-designation.
ABC Usage Reporting and Re-designation
• You define percentages for A, B, and C items in the System Parameters.
• Items are ranked by year-to-date (YTD) usage value.
•YTD usage value equals YTD usage units multiplied by the standard unit cost.
• Total YTD usage value equals the sum of YTD usage values for all items.
• Cumulative YTD usage value equals the sum of YTD usage value (this and higher ranking items).
• Cumulative Percentage Price = (YTD Usage Dollars / Total YTD Usage Dollars )× 100
• Rankings and cumulative price percentages indicate which items are redesignated A, B, and C.
New ABC designations can be stored in the Item Master file (IIM). • An optional feature of the ABC code control is the cycle count selection process. Cycle Counting Inventory Management requires inventory values in the computer system to equal inventory values in the warehouse. You can do this by cycle counting. The following figure highlights the benefits of cycle counting: • Cycle counting provides continuous, precise inventory control, including feedback needed to assess reasons for book-to-actual discrepancies. • Cycle counting is done frequently (daily, weekly) and does not interrupt production activity. • The number of cycle counts per year may also be defined and items up for cycle counting can be automatically provided. Physical Inventory Physical Inventory is a sub-system of the Smart RFID Inventory Management Inventory. It allows you to update your book (system) inventory values with an actual physical count of the inventory. Production is usually discontinued during the physical count. The Inventory Management provides a complete physical inventory sub-system. This includes physical inventory tags, missing tag list, book versus physical inventory, and automatic reconciliation of physical to book. A physical inventory may be done for all warehouses or for any set of individual warehouses. The physical inventory should be taken after the inventory close for a year. Then the physical inventory should be reconciled to the book inventory before the close of the next year. Reports include physical inventory by item and by warehouse/tag. Item Unit of Measure Options The unit of measure is the quantity in which an item is managed. There are three units of measure: purchase, stocking and selling. During different stages, items can be managed in different measurements. When an item is purchased it may come from the vendor/supplier in different quantity measurements than it is stocked. Items may also be sold in different quantity measurements than they are purchased or sold. The system tracks several different units of measure and automatically tracks correct conversion quantities. Units of measure (UOM) for each item are defined within the Item Master. Units of measure are user defined in the Smart RFID System Code Tables. Each item can have a purchase unit of measure different from its stocking unit of measure. Purchase Unit of Measure The Purchase Unit of Measure is used in Purchasing when items are purchased from vendor/suppliers in different quantities than they are stocked. Purchase units of measure are used exclusively for purchase order transactions. To obtain the quantity in the stocking unit of measure, multiplies the receipt quantities by the purchasing unit of measure conversion factor. Purchasing units of measure are used for: • Vendor quotes • Receipts and returns • Purchase order costing The purchasing unit of measure will default from the stocking unit of measure unless defined otherwise. The system automatically converts from the purchase unit of measure to the stock unit of measure during purchase order receipt. Inventory is always updated in stocking unit of measure. Stocking Unit of Measure Stocking unit of measure is an internal measure used by inventory to stock items. Stocking units of measure default for all transactions. Selling Unit of Measure Customer Order Entry uses the Stocking Unit of Measure as the default unit of measure when the selling unit of measure is different from it. Pricing and quantity breaks use the stocking unit of measure. Order Entry and Billing uses Selling Units of Measure. To obtain the quantity in the stocking unit of measure, The System multiplies the issued quantities by the selling unit of measure conversion factor. Selling units of measure are used for: • Ordered quantities • Shipped quantities in Billing Inventory Transaction
 Step:
Step:
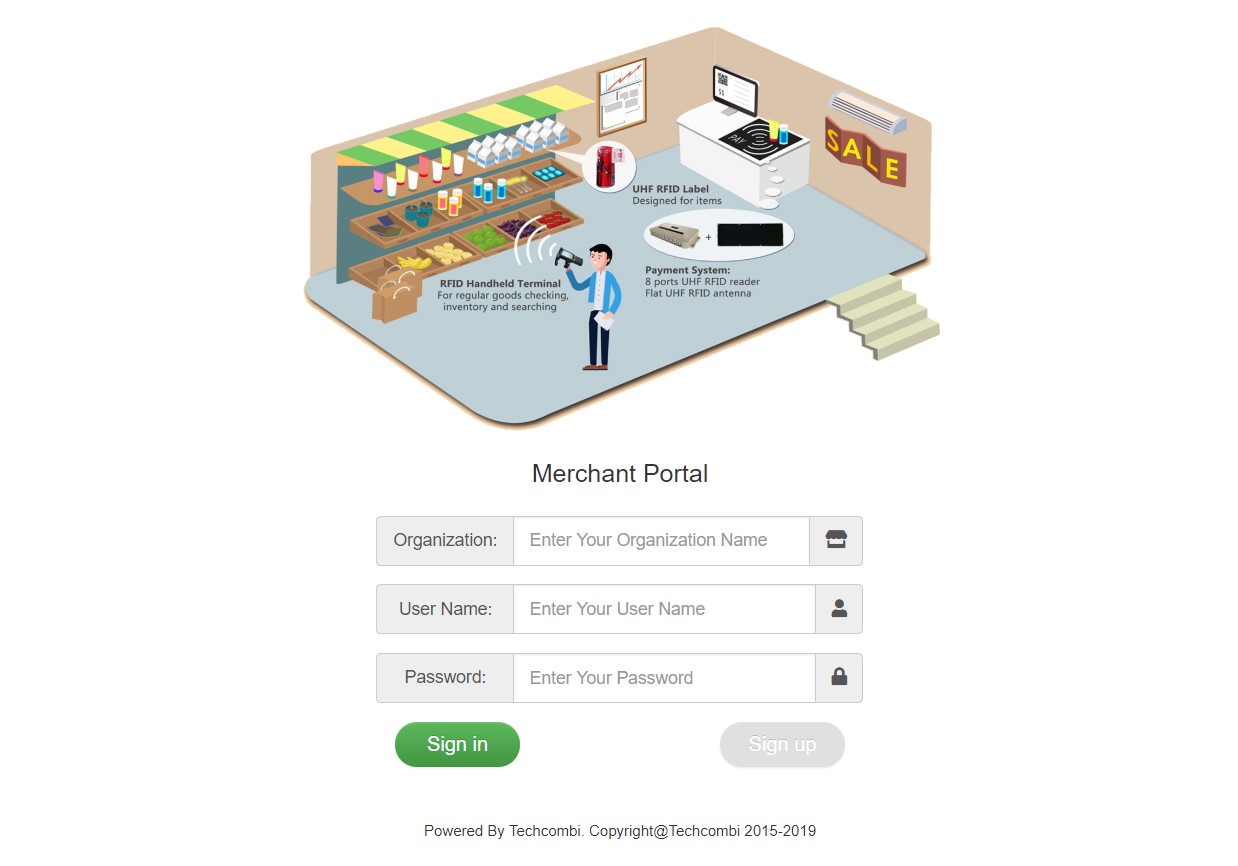
- Enter URL (techcombi.com) in any explorer in the address bar
- Click on the Merchant Login on the menu right site
- After the login Screen is displayed, input your organization ID, User ID and password
- Click on the [Sing in]
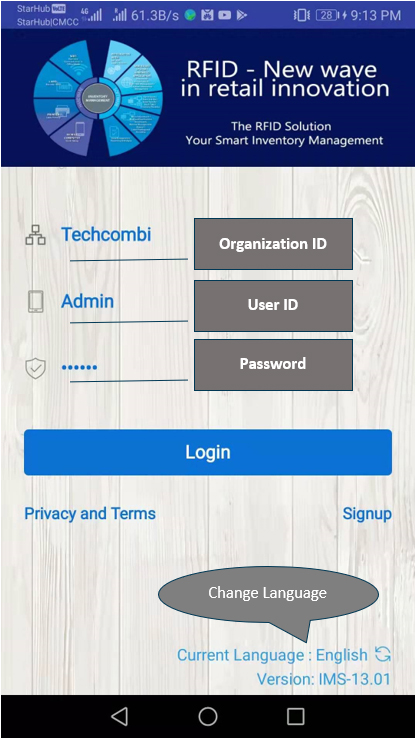 Step:
Step:
- Tap on the terminal at Inventory management
- After the login Screen is displayed, input your organization ID, User ID and password
- Click on the [Login]
This section highlights the common operation procedures of the System
- Mouse Operation
Users can access the system by simply using the Mouse to select the Function.
- Tab by Finger
Users can access the terminal by simply using finger tap on the screen to select the Function.
Initial configuration of the application which will let you configure the company, facility, warehouse, location, unit, category as well as items.
 Create a new organization
This function is only valid to Techcombi Pte Ltd for create new organization who will manage their own staff, prerequisites and inventory information.
Steps:
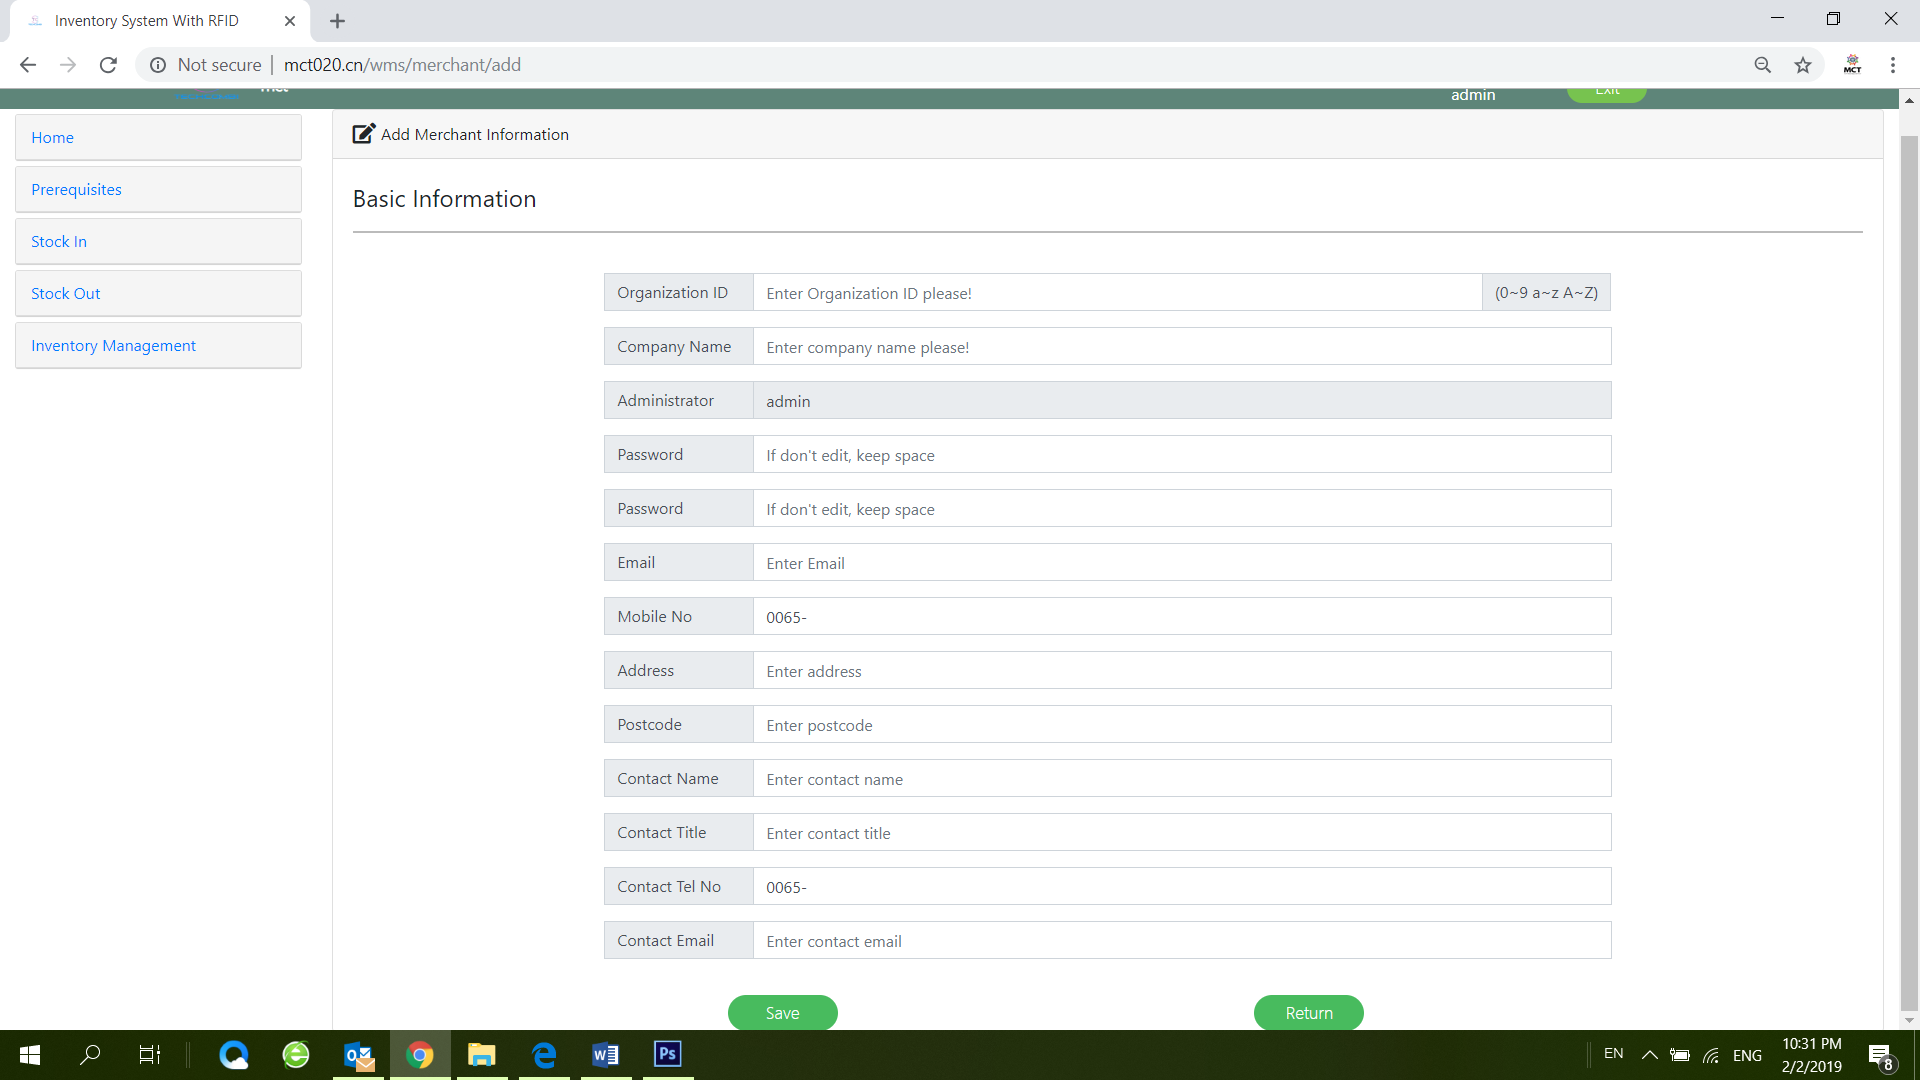
1) In Prerequisites, click Company.
2) Click [New] button.
3) Type company information for creating an organization.
4) If all data were correct, then click [Save] button to save.
5) Click [Return] button to omit the input and return.
Create a new organization
This function is only valid to Techcombi Pte Ltd for create new organization who will manage their own staff, prerequisites and inventory information.
Steps:
1) In Prerequisites, click Company.
2) Click [New] button.
3) Type company information for creating an organization.
4) If all data were correct, then click [Save] button to save.
5) Click [Return] button to omit the input and return. Steps:
1) In Prerequisites, click Staff.
2) Click [New] button.
3) Type staff information for creating a staff.
4) If all data were correct, then click [Save] button to save.
5) Click [Return] button to omit the input and return.
Steps:
1) In Prerequisites, click Staff.
2) Click [New] button.
3) Type staff information for creating a staff.
4) If all data were correct, then click [Save] button to save.
5) Click [Return] button to omit the input and return.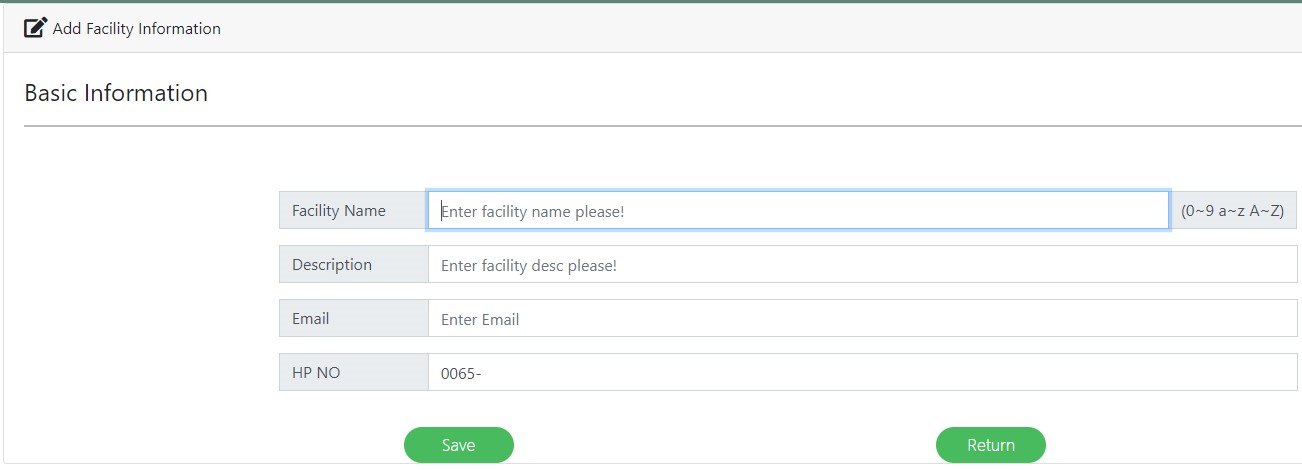 Steps:
1) In Prerequisites, click Facility.
2) Click [New] button.
3) Type facility information for creating a facility.
4) If all data were correct, then click [Save] button to save.
5) Click [Return] button to omit the input and return.
Steps:
1) In Prerequisites, click Facility.
2) Click [New] button.
3) Type facility information for creating a facility.
4) If all data were correct, then click [Save] button to save.
5) Click [Return] button to omit the input and return.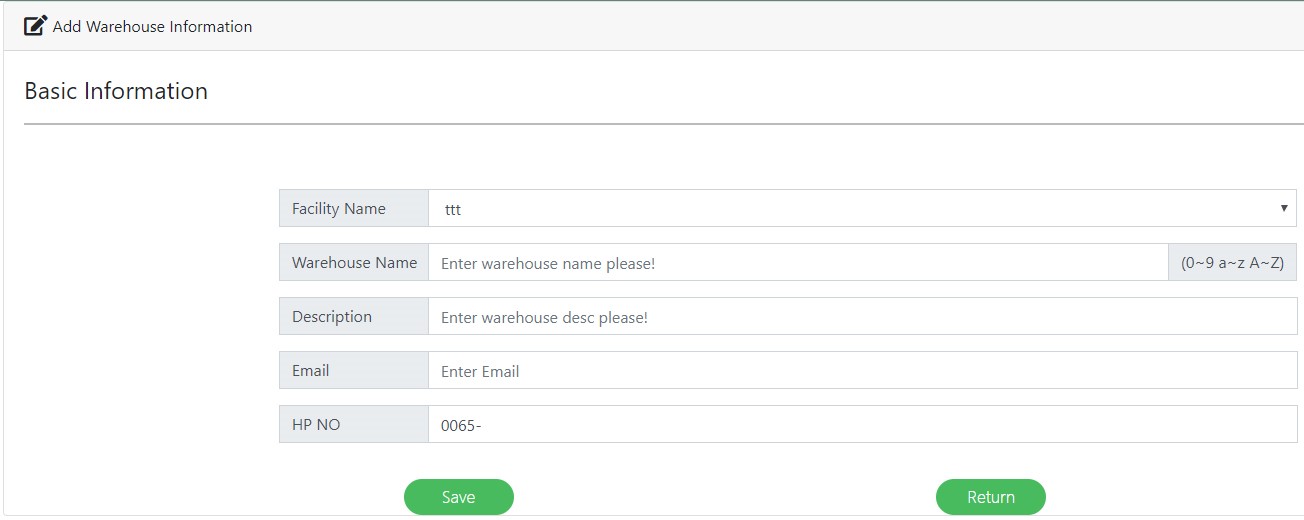 Steps:
1) In Prerequisites, click Warehouse.
2) Click [New] button.
3) Select one facility first.
4) Type warehouse information for creating a warehouse.
5) If all data were correct, then click [Save] button to save.
6 Click [Return] button to omit the input and return.
Steps:
1) In Prerequisites, click Warehouse.
2) Click [New] button.
3) Select one facility first.
4) Type warehouse information for creating a warehouse.
5) If all data were correct, then click [Save] button to save.
6 Click [Return] button to omit the input and return.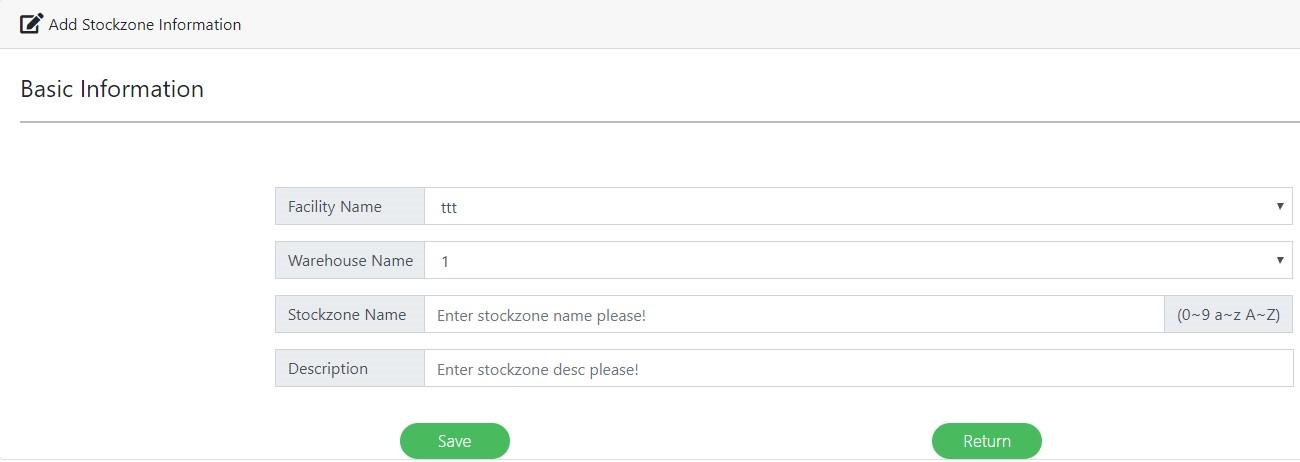 Steps:
1) In Prerequisites, click Stockzone.
2) Click [New] button.
3) Select one facility first.
4) Select one warehouse
5) Type stockzone information for creating a stockzone.
6) If all data were correct, then click [Save] button to save.
7) Click [Return] button to omit the input and return.
Steps:
1) In Prerequisites, click Stockzone.
2) Click [New] button.
3) Select one facility first.
4) Select one warehouse
5) Type stockzone information for creating a stockzone.
6) If all data were correct, then click [Save] button to save.
7) Click [Return] button to omit the input and return.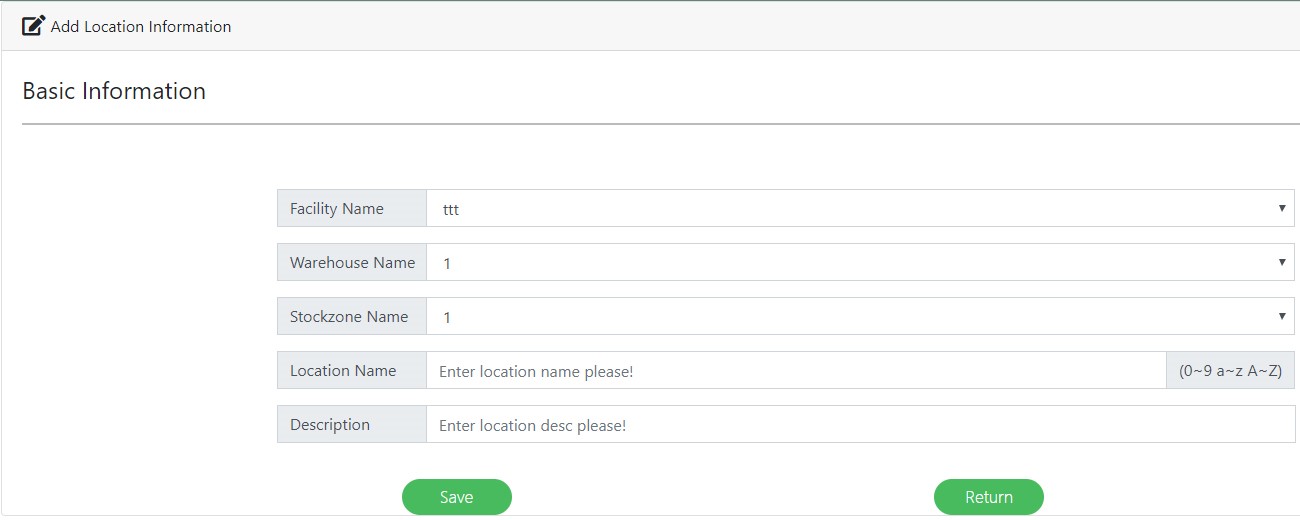 Steps:
1) In Prerequisites, click Location.
2) Click [New] button.
3) Select one facility first.
4) Select one warehouse
5) Select one stockzone
6) Type Location information for creating a location.
7) If all data were correct, then click [Save] button to save.
8) Click [Return] button to omit the input and return.
Steps:
1) In Prerequisites, click Location.
2) Click [New] button.
3) Select one facility first.
4) Select one warehouse
5) Select one stockzone
6) Type Location information for creating a location.
7) If all data were correct, then click [Save] button to save.
8) Click [Return] button to omit the input and return.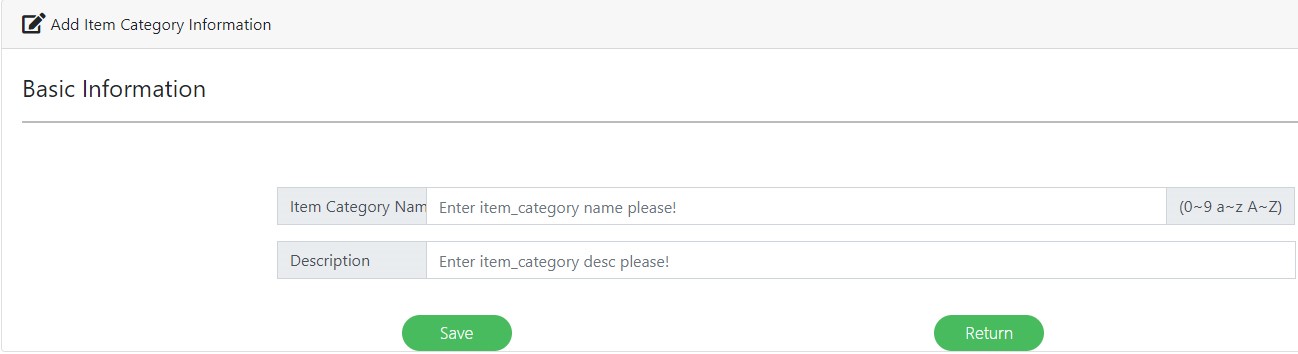 Steps:
1) In Prerequisites, click Category.
2) Click [New] button.
3) Type Category information for creating a category.
4) If all data were correct, then click [Save] button to save.
5) Click [Return] button to omit the input and return.
Steps:
1) In Prerequisites, click Category.
2) Click [New] button.
3) Type Category information for creating a category.
4) If all data were correct, then click [Save] button to save.
5) Click [Return] button to omit the input and return.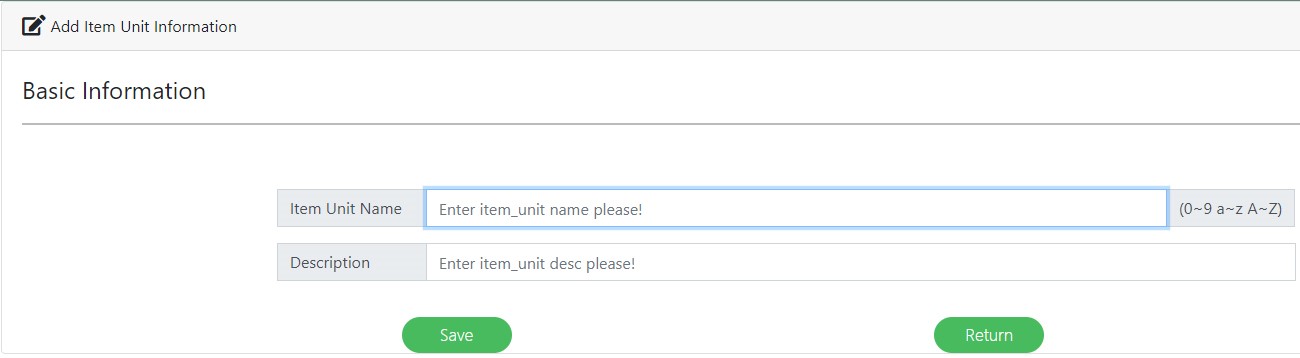 Steps:
1) In Prerequisites, click Unit.
2) Click [New] button.
3) Type Unit information for creating a unit.
4) If all data were correct, then click [Save] button to save.
5) Click [Return] button to omit the input and return.
Steps:
1) In Prerequisites, click Unit.
2) Click [New] button.
3) Type Unit information for creating a unit.
4) If all data were correct, then click [Save] button to save.
5) Click [Return] button to omit the input and return.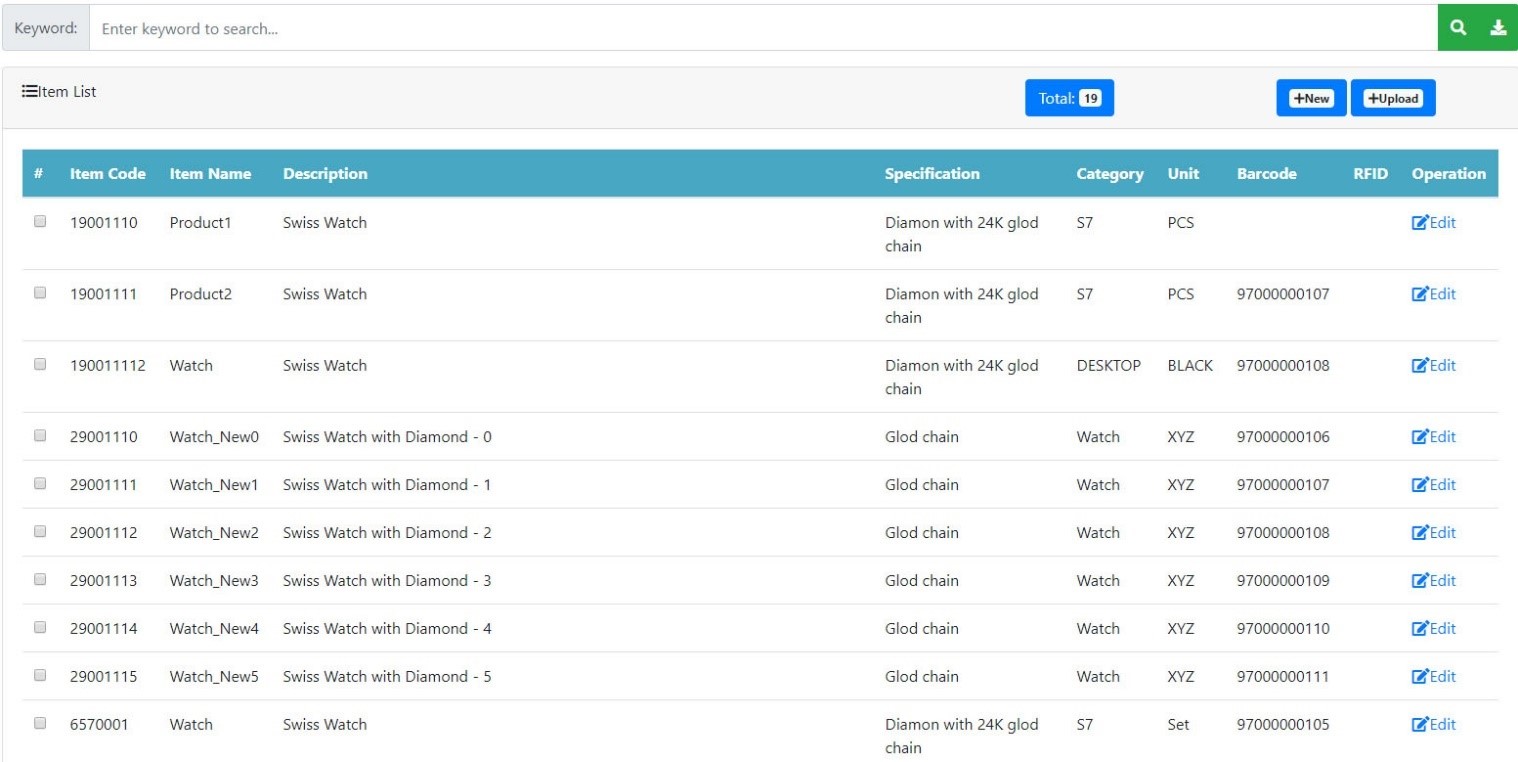 In the initial, items can be [Upload] from CSV format file, please use [Download] to get the sample in which you can enter all records according to the format and saved as CSV format.
Want to enter a new item, please follow bellow steps.
Steps:
1) In Prerequisites, click Item.
2) Click [New] button.
3) Type Item information for creating an item.
4) If all data were correct, then click [Save] button to save.
5) Click [Return] button to omit the input and return.
In the initial, items can be [Upload] from CSV format file, please use [Download] to get the sample in which you can enter all records according to the format and saved as CSV format.
Want to enter a new item, please follow bellow steps.
Steps:
1) In Prerequisites, click Item.
2) Click [New] button.
3) Type Item information for creating an item.
4) If all data were correct, then click [Save] button to save.
5) Click [Return] button to omit the input and return. Steps:
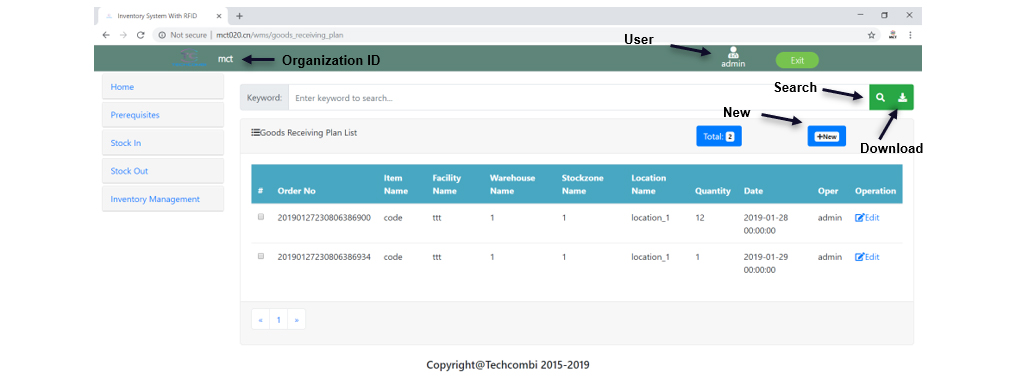
- In menu, click Stock in.
- In the pull down list, click on Receiving Plan
- Click [New] button to create a new receiving plan.
- In the window, please choose the value of Facility, Warehouse, Stockzone and location
- Input the figures of Item into Quantity which need to be received
- If all data were correct, then click [Save] button to save.
- Click [Return] button to omit the input and return to main menu
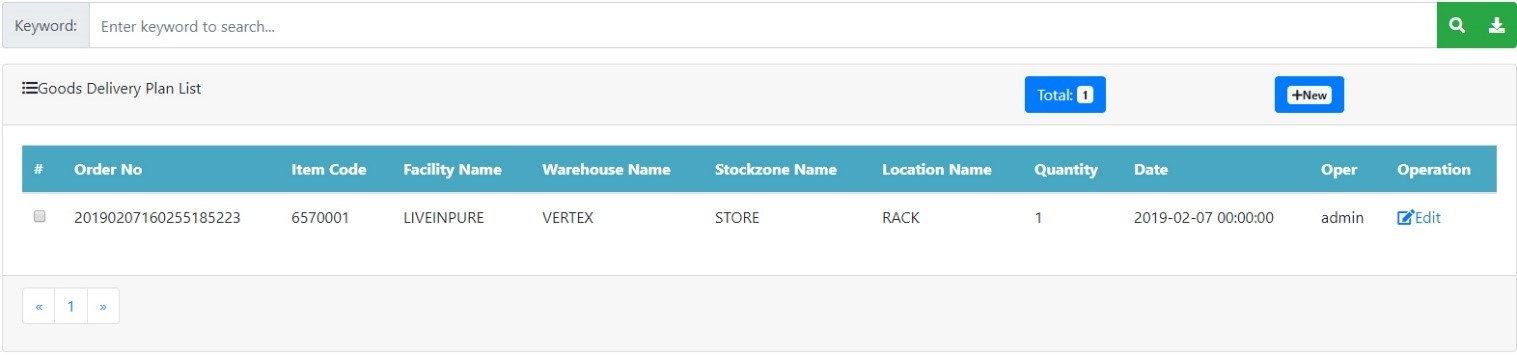
 Steps:
- In menu, click Stock out.
- In the pull down list, click on Issuing Plan
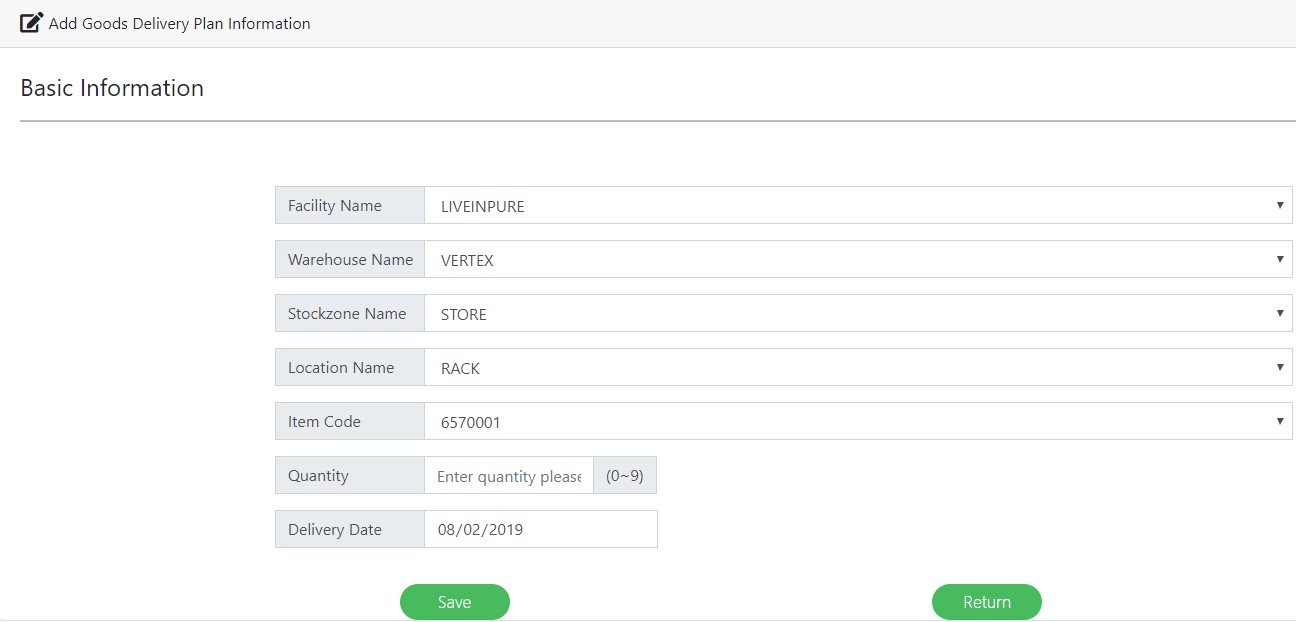
- Click [New] button to create a new Issuing plan.
- In the window, please choose the value of Facility, Warehouse, Stockzone and location
- Choose an item to be issued
- Input the figures of Item into Quantity which need to be issued
- If all data were correct, then click [Save] button to save.
- Click [Return] button to omit the input and return to main menu
Use your laptop or desktop to management your inventory which will include the movement of inventory, transaction of inventory, balance of inventory and stock take report, etc,.
 Steps:
- In menu, click Inventory Management.
- In the pull down list, click on Inventory Enquiry
- In the window will show all inventory in the window
- Download the report click on “Download” to download the report
- Print the report click on “Print” to print the report
- In menu, click Inventory Management.
- In the pull down list, click on Goods Transaction Report
- In the window will show all transactions in the window
- Download the report click on “Download” to download the report
- Print the report click on “Print” to print the report
 Steps:
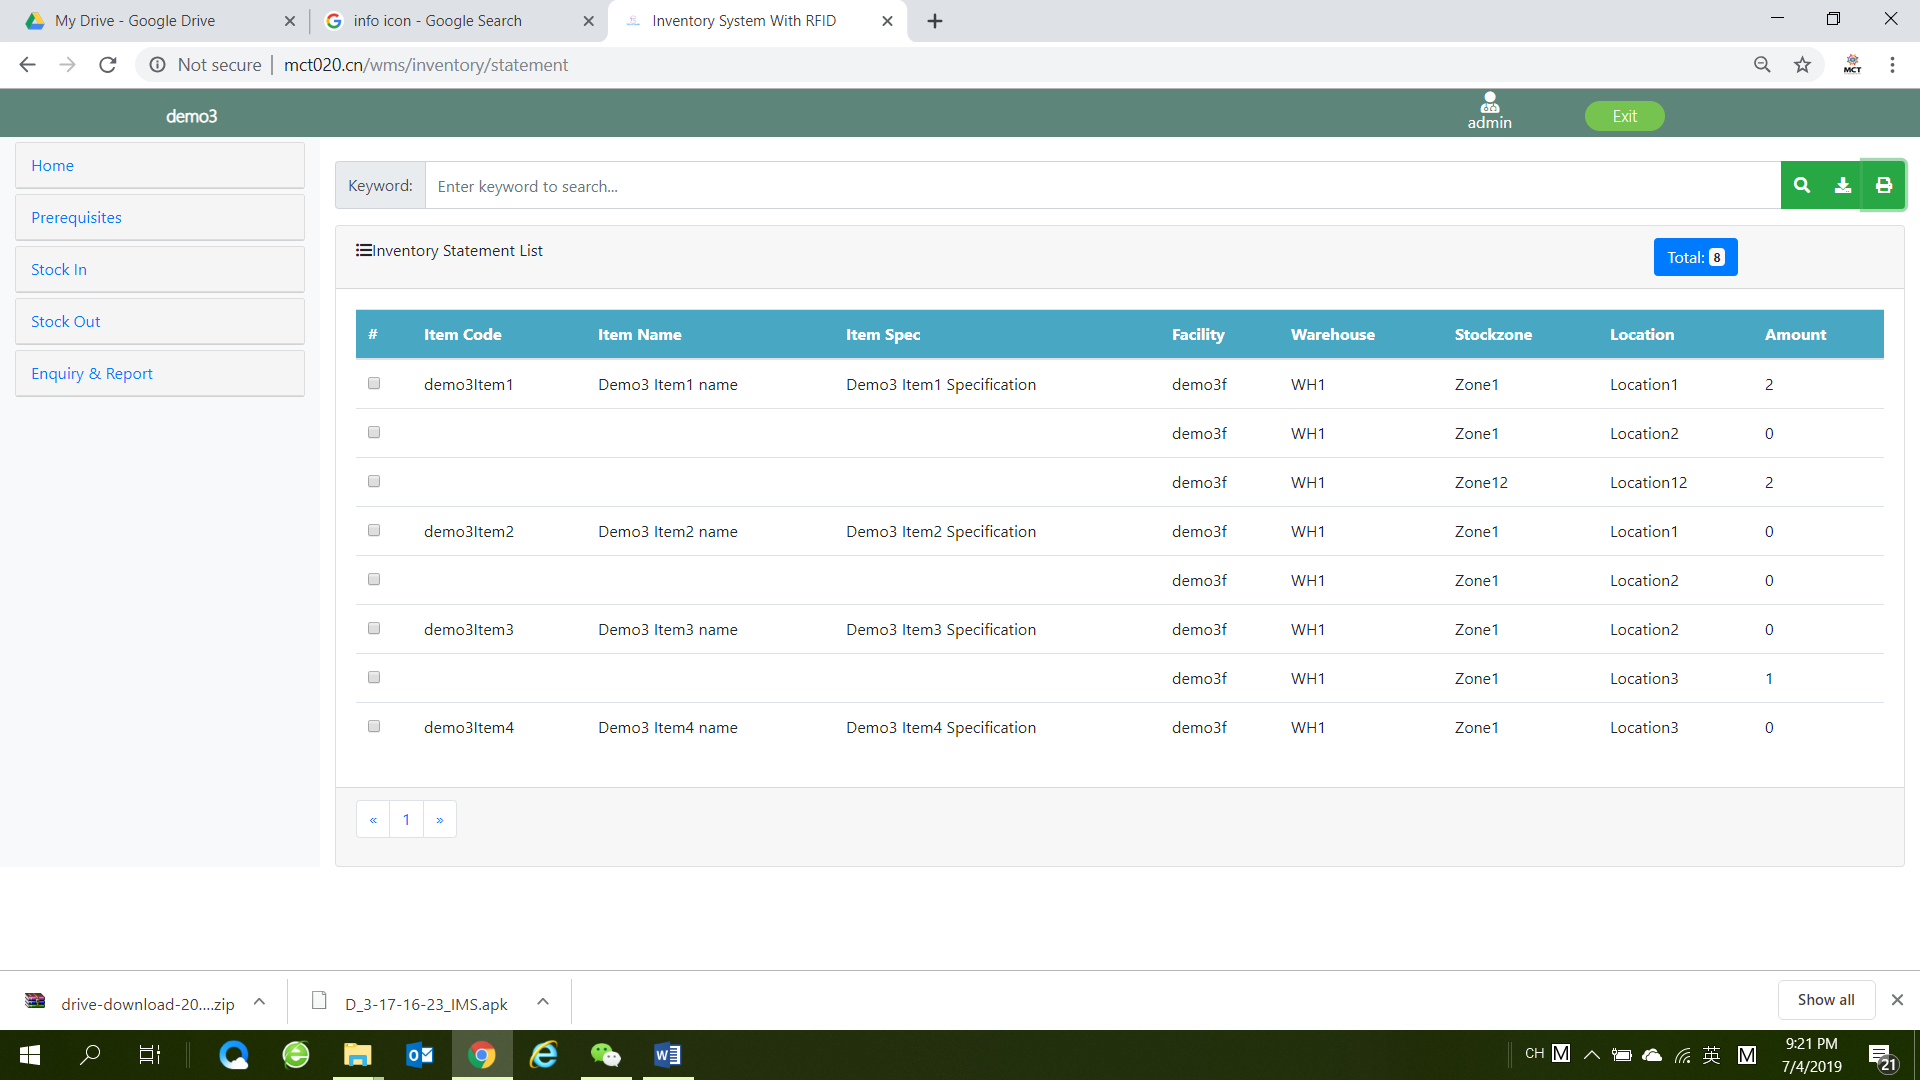
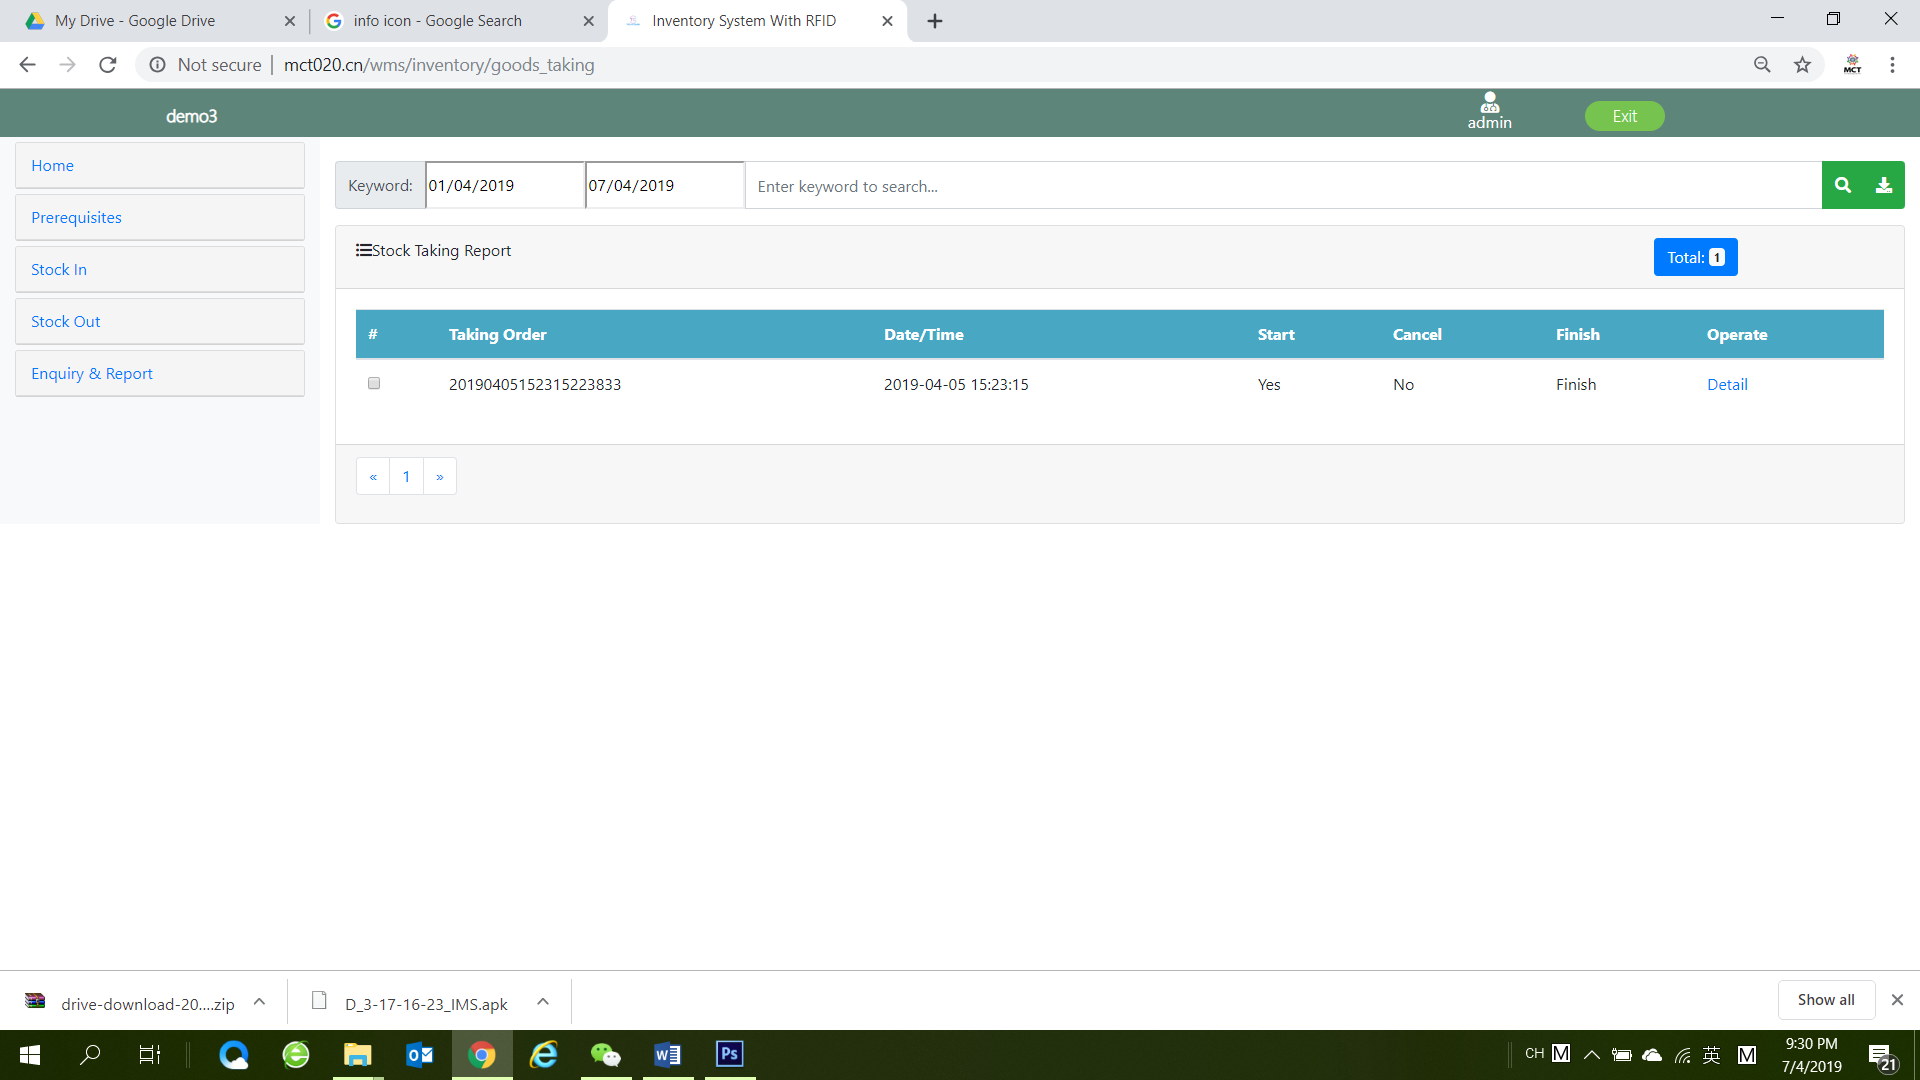
- In menu, click Inventory Management.
- In the pull down list, click on Stock Taking Report
- In the window will show all result of any stock taking in the window
- In the list record select the one you want to know the detail then lick the “Detail”
- The report of stock taking will be showed in bellow
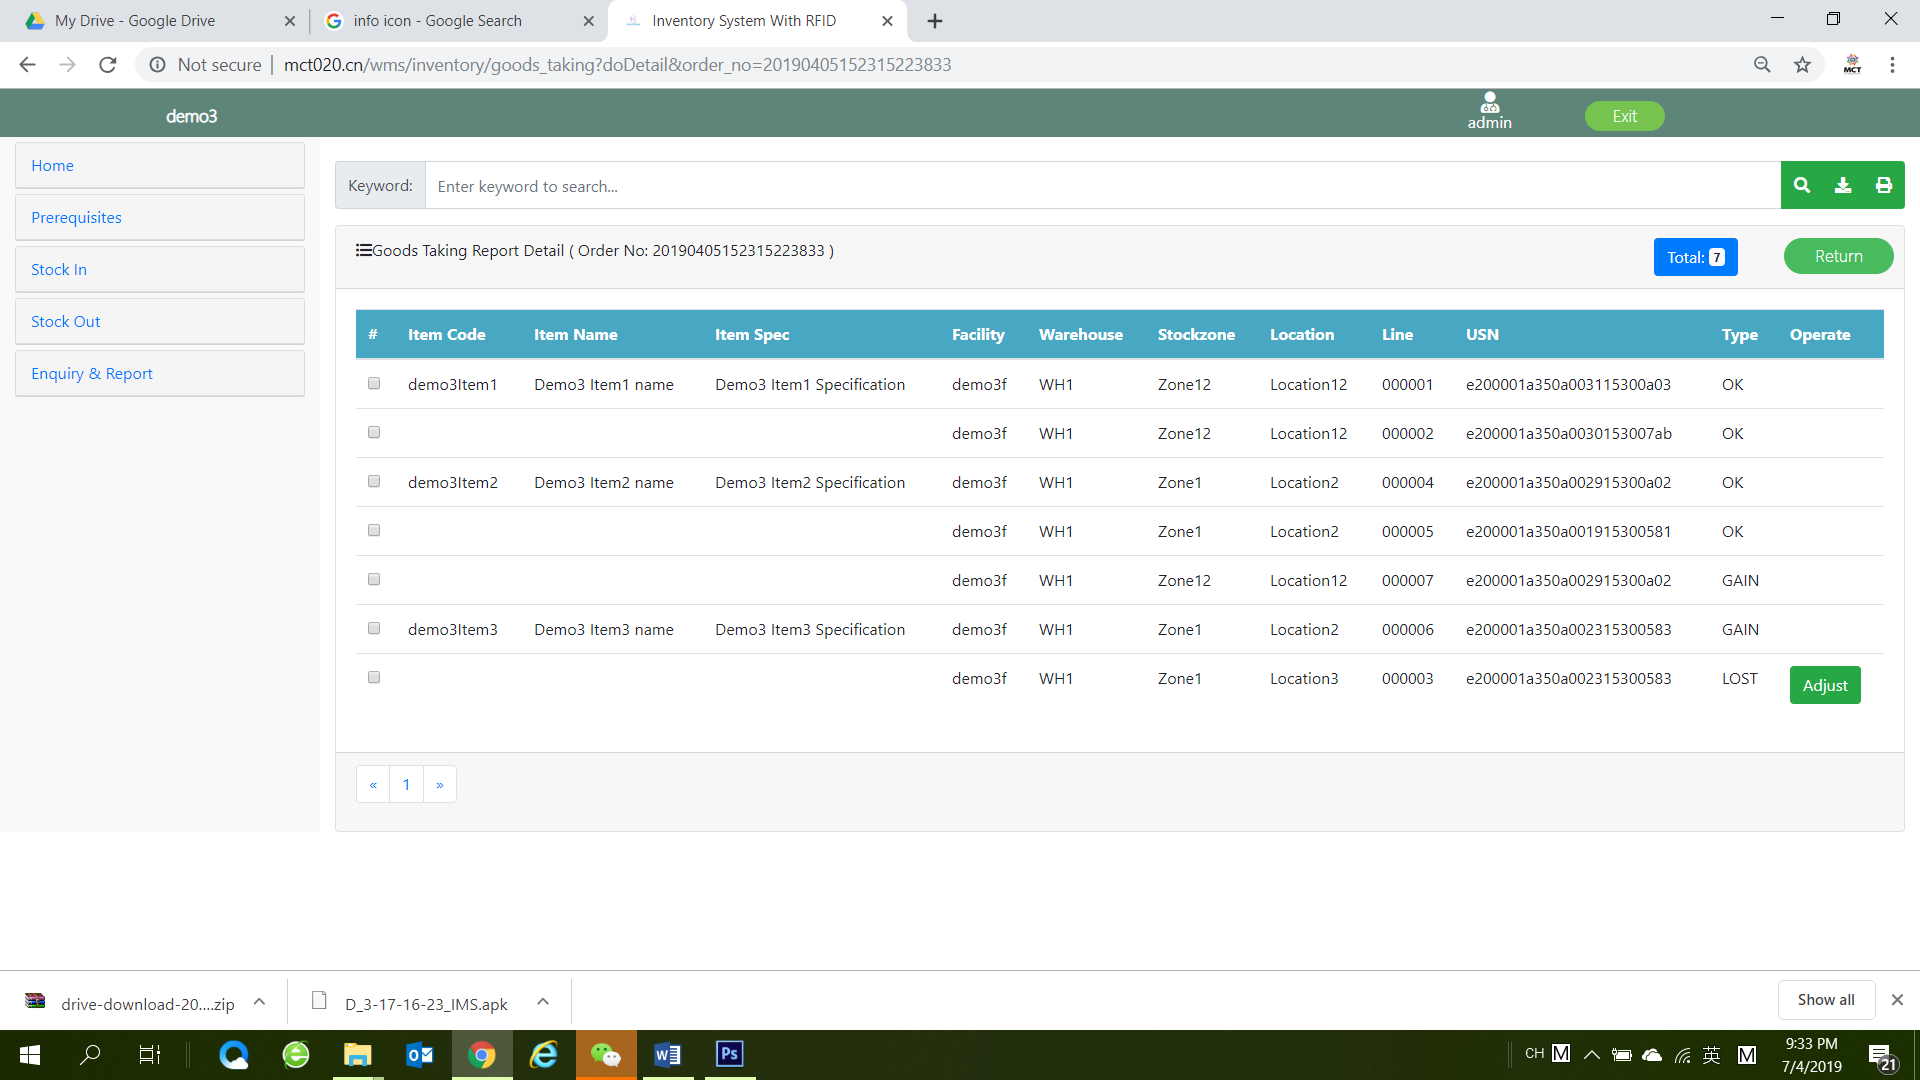
- If you want to rectify the inventory balance then click “Adjust”
- The confirmation window will be showed
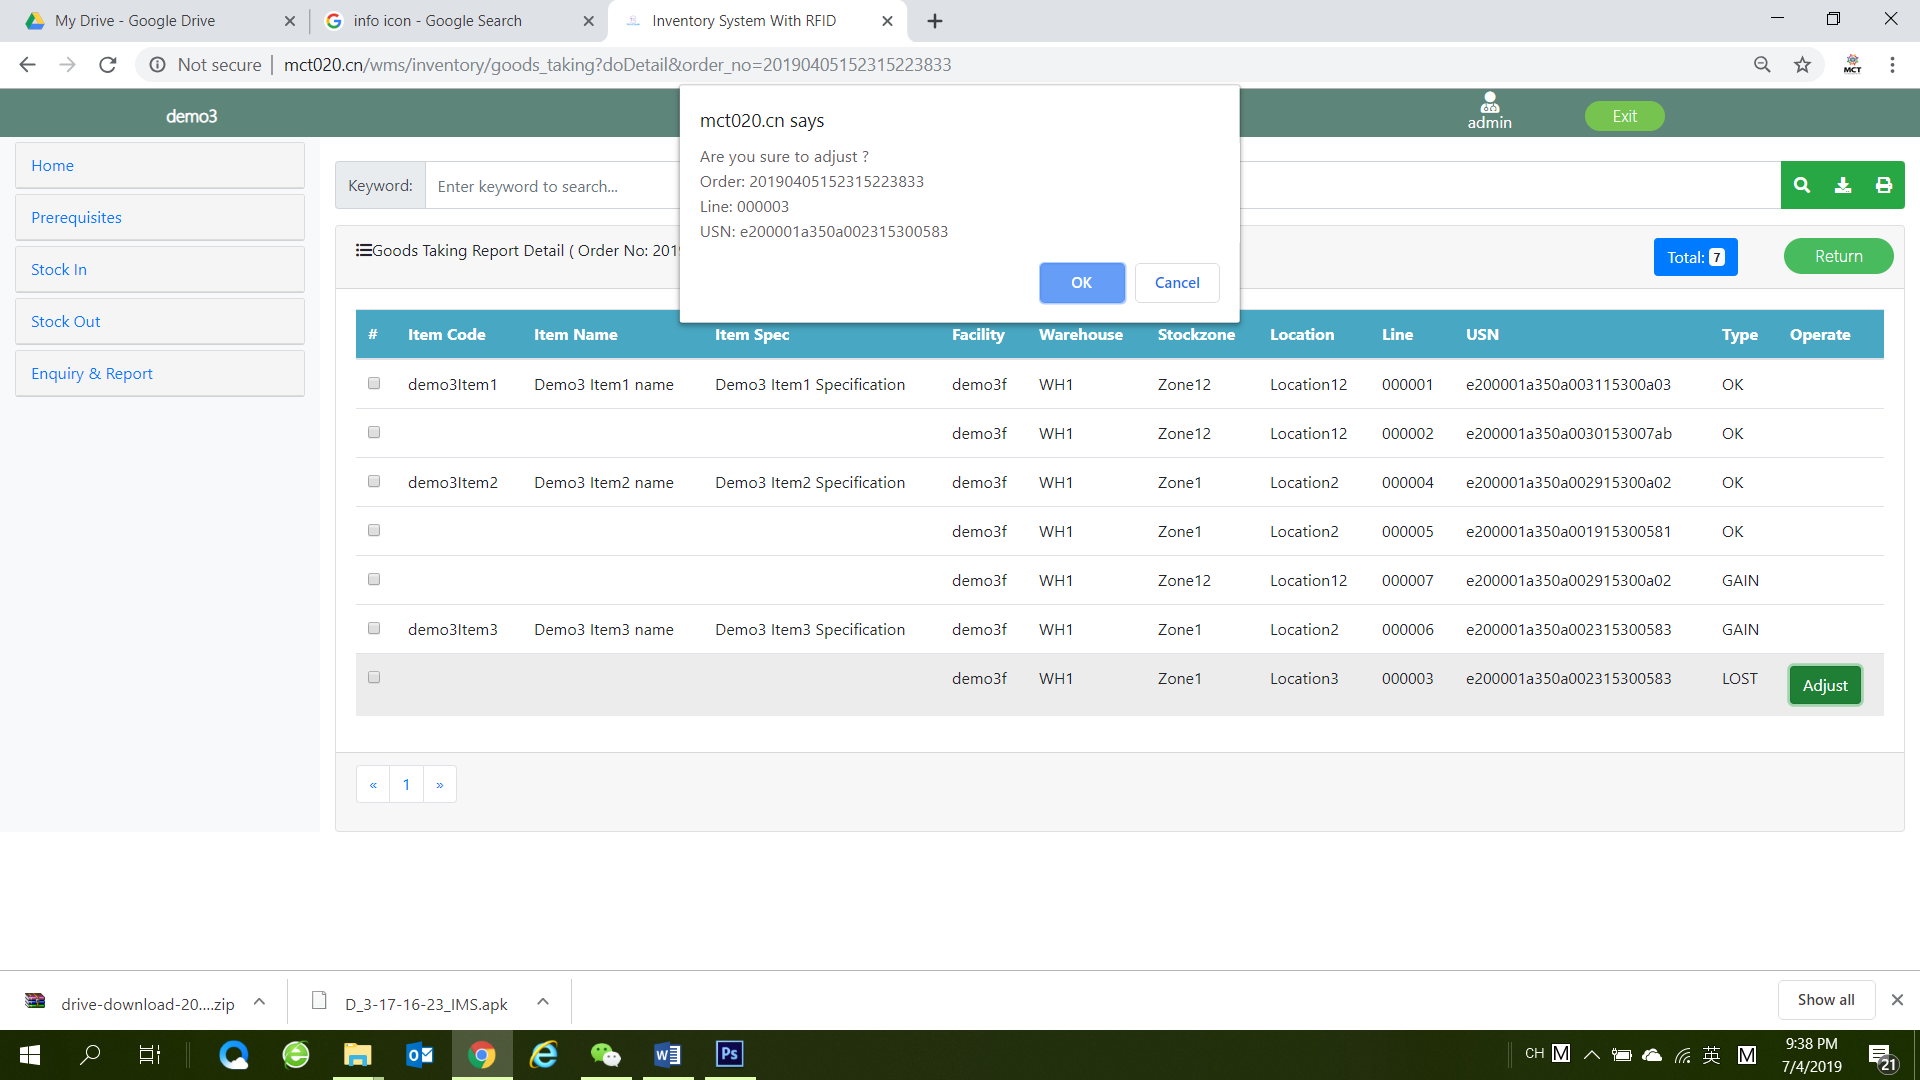
- If you want to rectify the record then click OK to complete otherwise click Cancel to ignore your modification.
- Download the report click on “Download” to download the report
- Print the report click on “Print” to print the report
 Step:
Step:
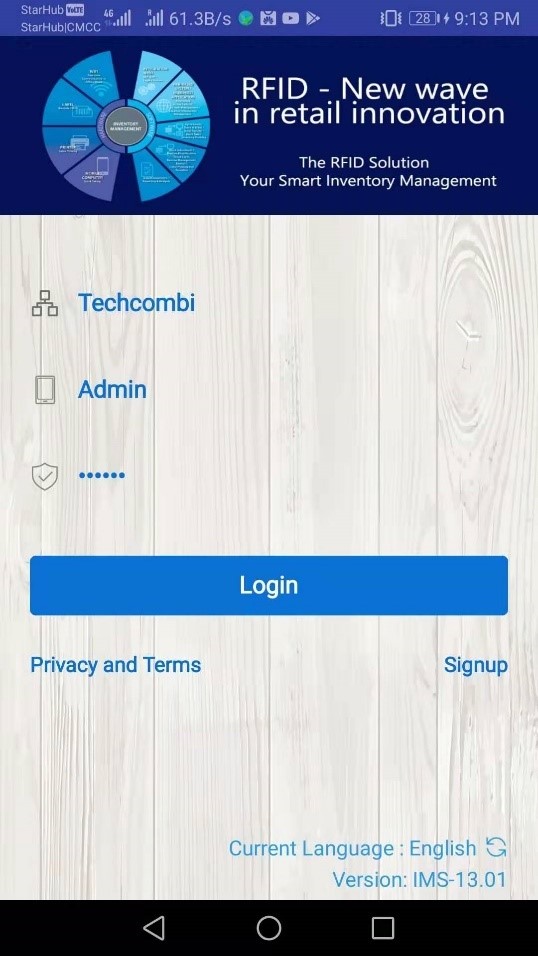
- Tap on the icon of Inventory management in the handheld terminal
- Before entering into the handheld system, please tap on the Privacy and Terms to read the information in very careful, if you want to change to another language, please tap on the English
- In the login Screen, input your organization ID, User ID or store name and password
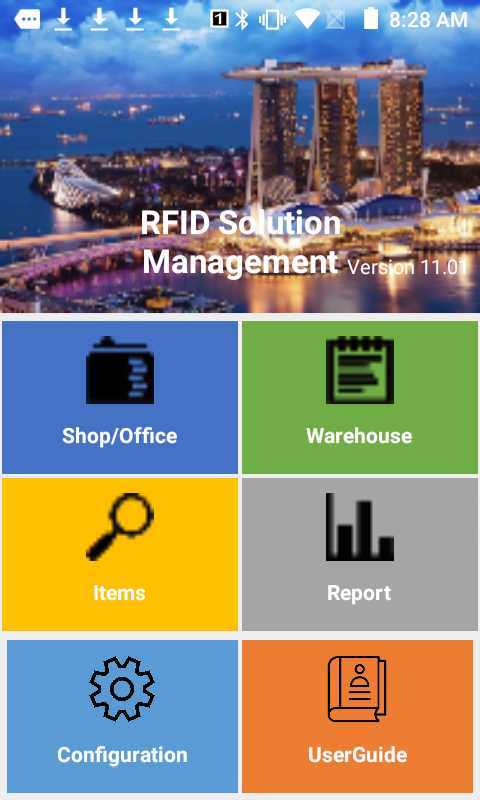
- Click on the [Login], if your input information is correct, then the app will lead you into a main screen
- Tap on the icon of Inventory management in the handheld terminal
- Before entering into the handheld system, please tap on the Privacy and Terms to read the information in very careful, if you want to change to another language, please tap on the English
- In the login Screen, input your organization ID, User ID or store name and password
- Click on the [Login], if your input information is correct, then the app will lead you into a main screen
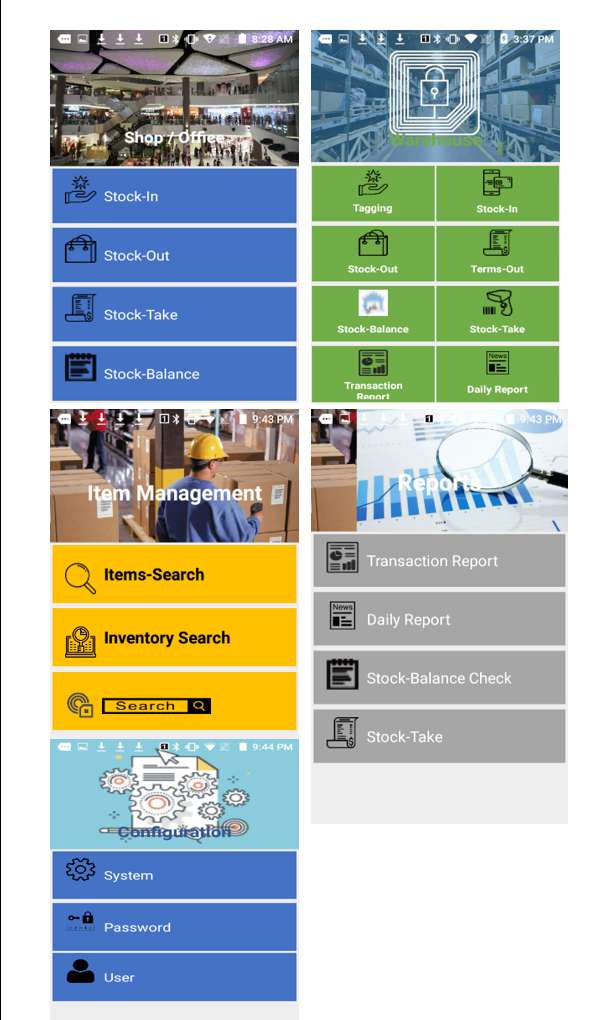
 Sub-Menu
 Steps:
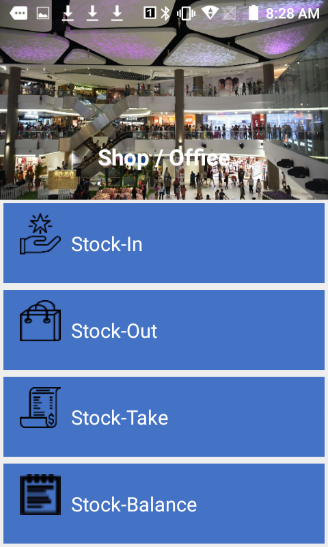
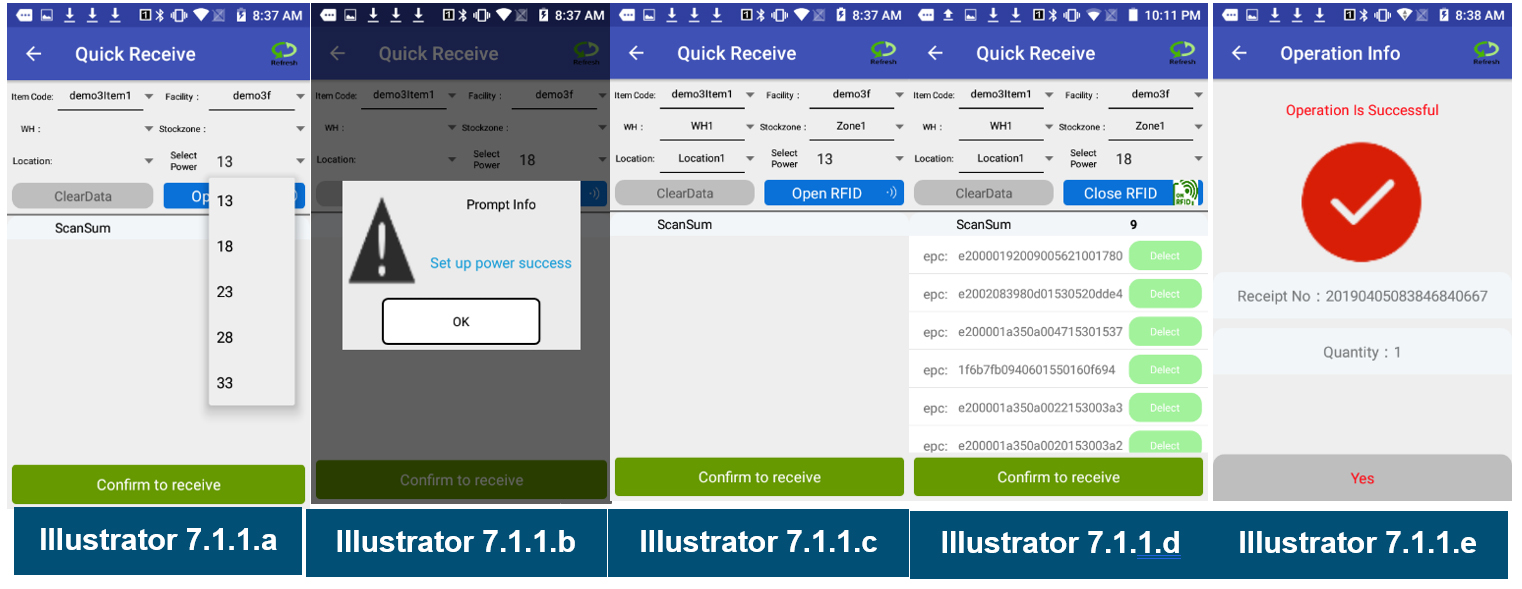
- In Shop and Office menu, tap on [Stock-in].
- Then the screen will be launched (Illustrator 7.1.1.a)
- You can adjust the power to minimize the distance for detecting any RFID (there are 5 bands, 13 is the minimum, 33 is the maximum) the default value is 28, if you want to adjust, just click the pull down icon to choose any number then the power will be pre-set.
- When the power is successful set up then the successful info will be showed (Illustrator 7.1.1.b)
- Now you need to select the item which will be tagged with scanned RFID and also need to input the place where the item will be placed. The place set up you need to follow the bellow sequence: [1] Facility, [2] WH, [3] Stockzone and [4] Location. (Illustrator 7.1.1.c)
- Now you can tap On the middle blue command to tag RFID into items.
- The handheld will detect all RFID Tags which to be showed on the screen (Illustrator 7.1.1.d)
- if all Detect RFID are correct, you need to tap on Confirm to receive to update the inventory for the items.
- Then the system will prompt a successful message in a new window (Illustrator 7.1.1.e)
- After tap on Yes, the tagged items will be saved into inventory.
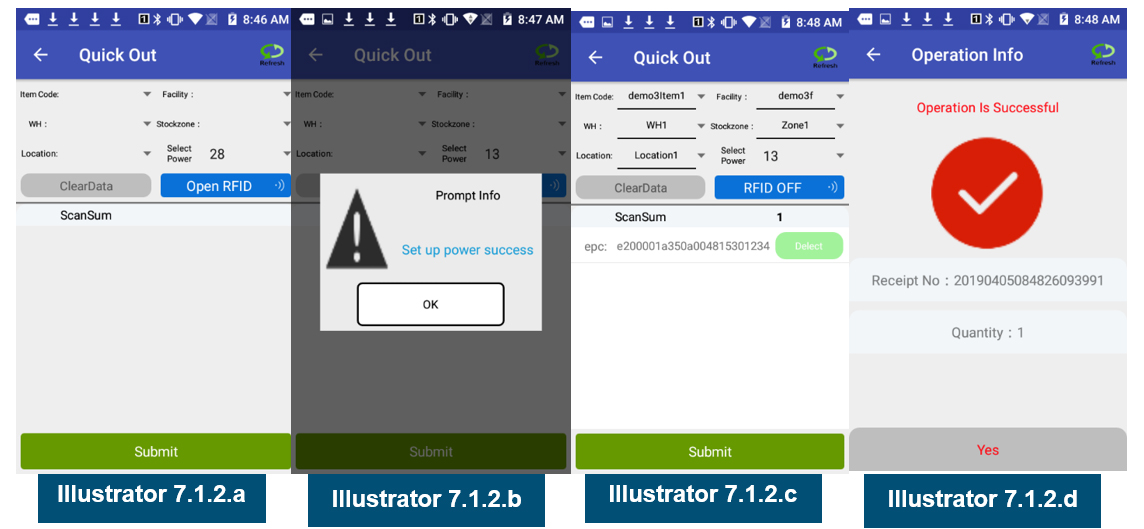
 Steps:
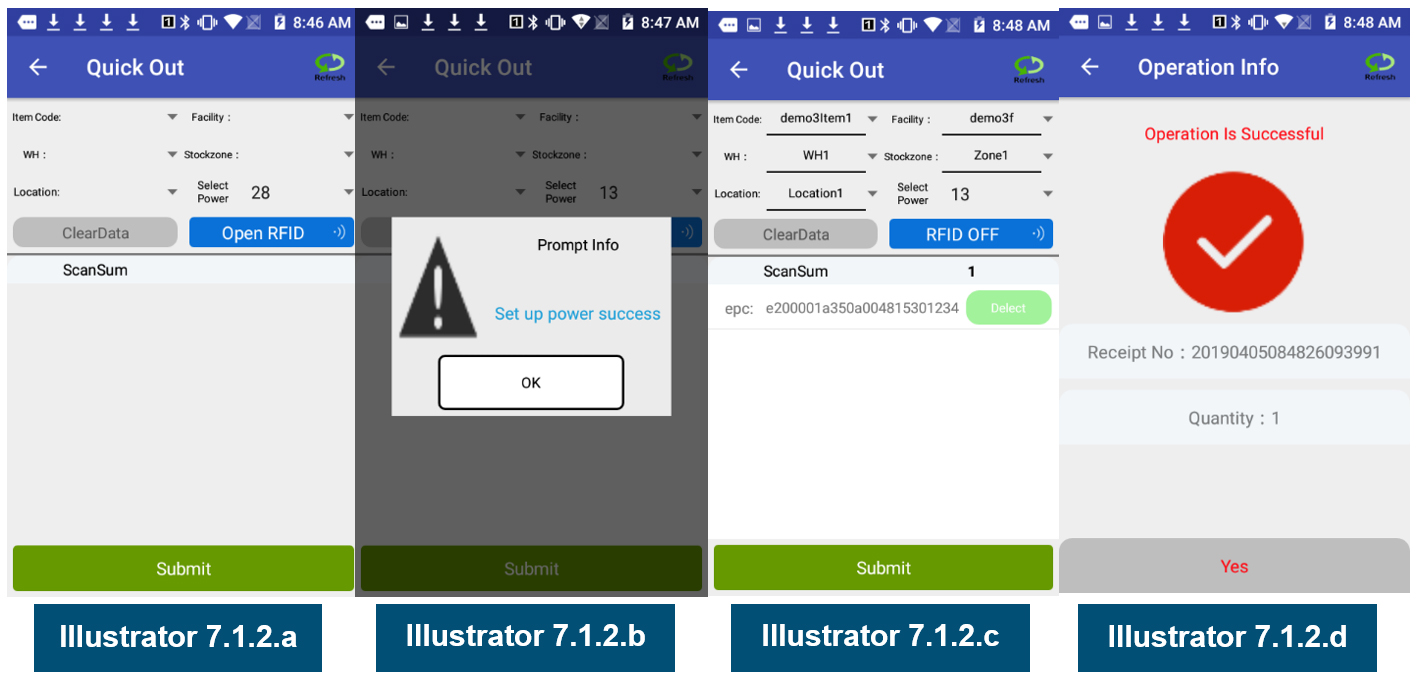
- In Shop and Office menu, tap on [Stock-Out].
- Then the screen will be launched (Illustrator 7.1.2.a)
- You can adjust the power to minimize the distance for detecting any RFID (there are 5 bands, 13 is the minimum, 33 is the maximum) the default value is 28, if you want to adjust, just click the pull down icon to choose any list number then the power will be pre-set.
- Once the RFID power is set to success the window will be showed (Illustrator 7.1.2.b)
- On the middle right command, tap on
- The handheld will detect all RFID Tags which to be showed on the screen (Illustrator 7.1.2.c)
- If you want to re-scan the issue RFID items, tap on the left site command [Cleardata] then all detected RFID will be cleared, and you need to repeat the step 4-5 again to obtain the RFID tags which need to be issued.
- if all detected RFID are correct, you need to tap on Submit command to upload the RFID tags into backend system to update the inventory.
- Then the system will show a successful message in a new window (Illustrator 7.1.2.d)
 Steps:
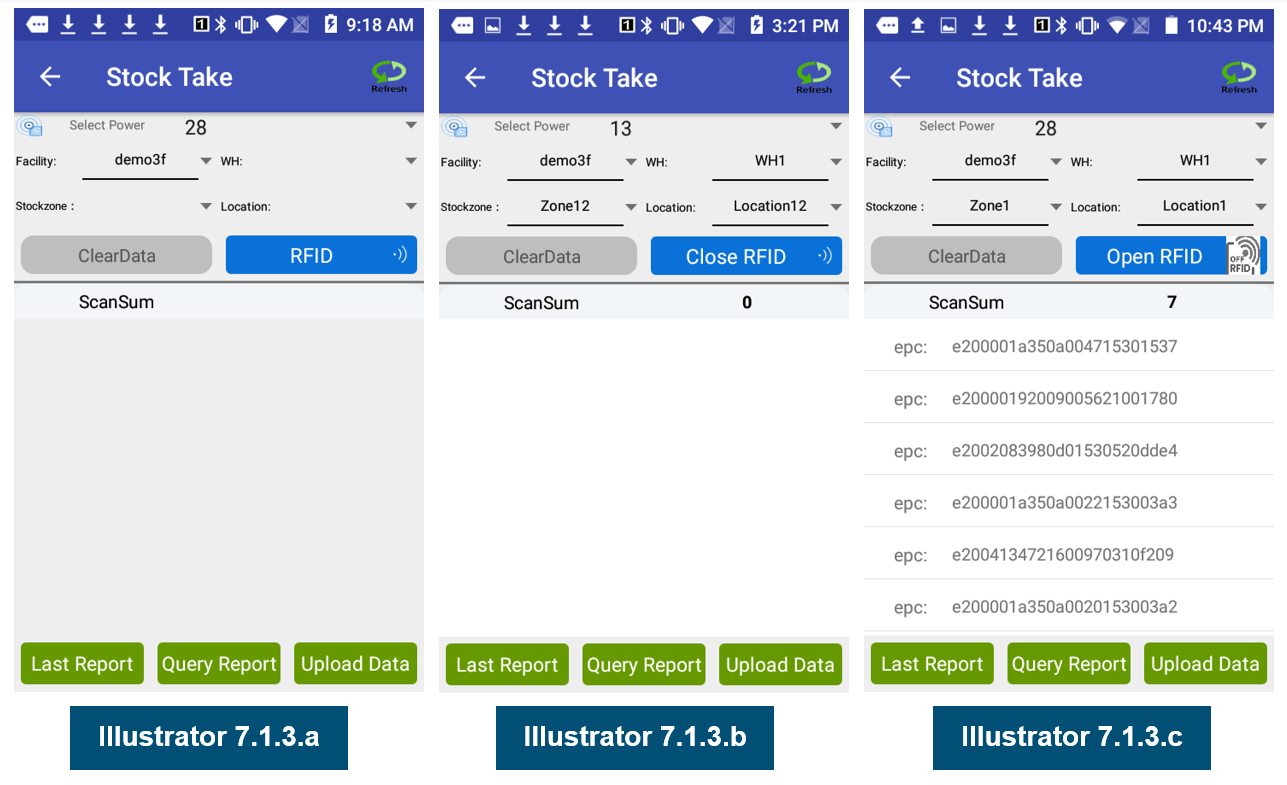
- In Shop and Office menu, tap on [Stock-take].
- Then the screen will be launched (Illustrator 7.1.3.a)
- You can adjust the power to minimize or maximum the distance for detecting any RFID (there are 5 bands, 13 is the minimum, 33 is the maximum), the default value is 28, if you want to adjust, just click the pull down icon to choose any list number then the power will be pre-set.
- After you have pre-set the RFID power, then you need to select the location where you need to do the stock take. (Illustrator 7.1.3.b)
- After you properly select the location, then you can switch on RFID to detect the RFID tags within the location. (Illustrator 7.1.3.c)
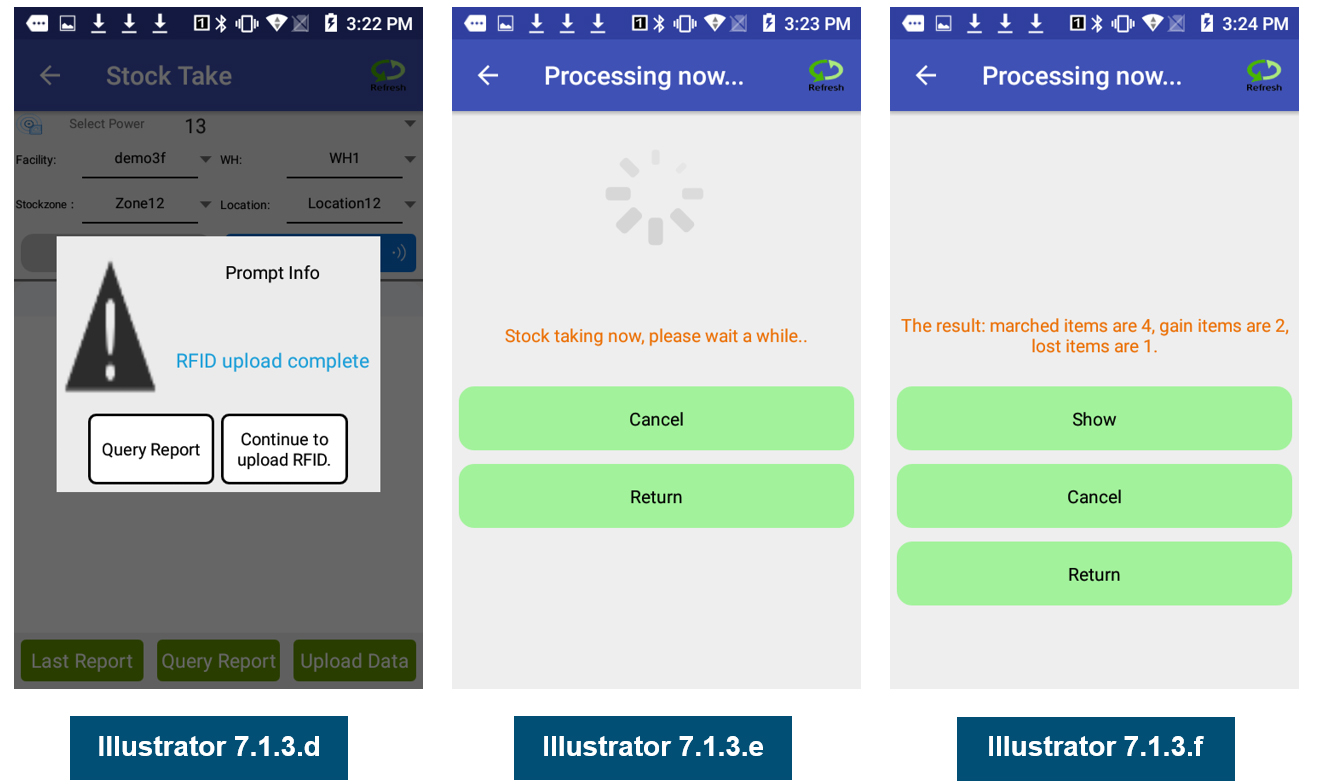
- If you think all of RFID items in the location have been already scanned, then tap on [Upload Data] to transmit these data into backend system to prepare the stock take report.
- If the RFID tags upload successful, then system will pop up and window which let you choose to generate the stock take report or do another round of RFID tags upload. (Illustrator 7.1.3.d)
- Once you tap on [Continue to Upload RFID] then you have to repeat steps 5 – 7 to upload all locations RFID into the system.
- If you tap on [Query Report], then system will start generating stock tack report for you. (Illustrator 7.1.3.e)
- This generating will consume some times depends on the network speed and the size of inventory , so please be patient to wait for the result.
- Once the system has finished the generation then will have a stock take report (Illustrator 7.1.3.f)
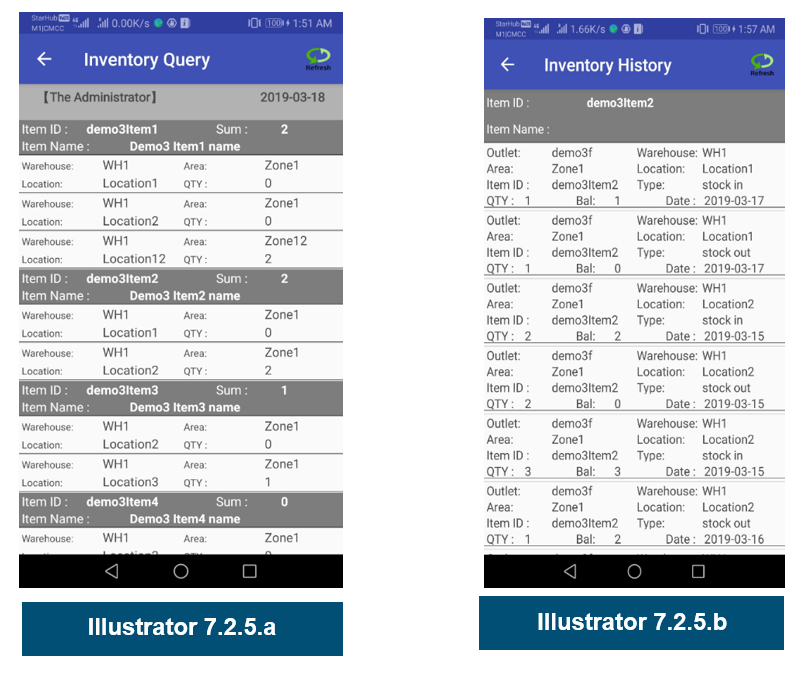
 Steps:
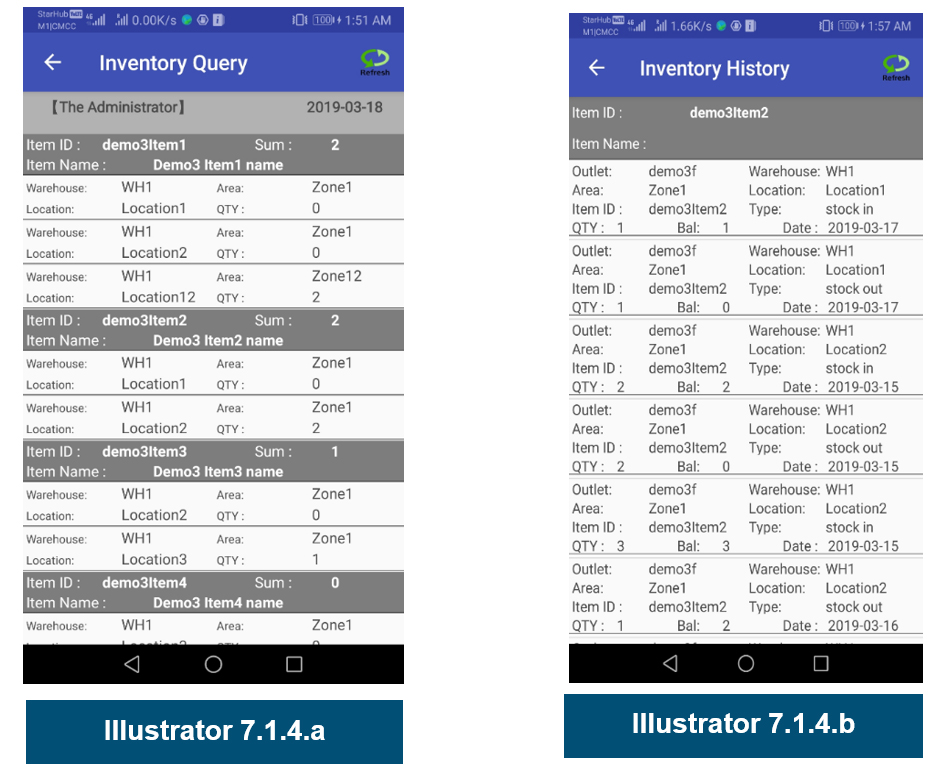
- In Shop and Office menu, tap on [Stock-Balance].
- Then the screen will be launched (Illustrator 7.2.5.a)
- You can tap on and hold to move up and down to check more RFID items.
- If you want to know the transaction details of any RFID item, please tap on any record in the Inventory Query screen, the system will lead a new screen to show all transaction belongs to the RFID Tag. (Illustrator 7.2.5.b)
This portion is specially for warehouse and logistics.
This function is a plan to assign RFID to item(s) which are ready to receive in a plan.
Note: the plan should be generated in backend (computer)
Steps:
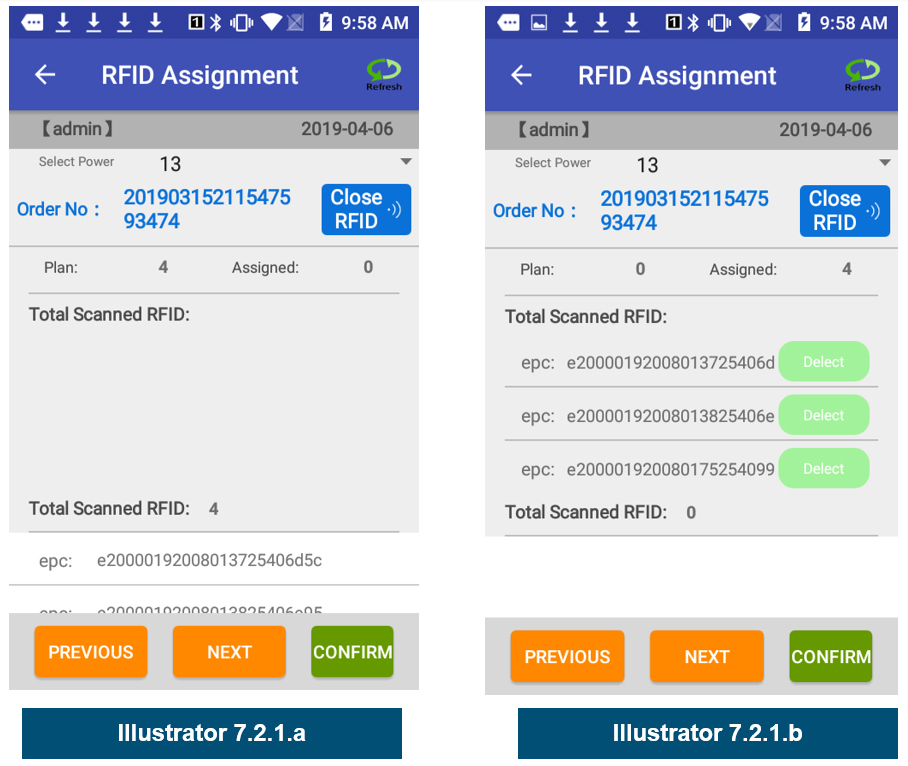
- In Warehouse menu, tap on [Tagging].
- New receive plans will be listed in the RFID Assign window (Illustrator 6.2.4.a)
- tap on one record which needs to assign RFID to the item, then the second screen the item and its plan number will be showed. (Illustrator 6.2.4.b)
(in initiate, the Assigned is 0 which means no RFID was assign to any item; and Total Scanned RFID also is 0, because there is no RFID tag was detected)
- On the upper right corner, tap on to start scan RFID, when RFID is detected, the number of RFID will be showed at Total Scanned RFID (Illustrator 6.2.4.c)
- Once the clerk tap on one RFID under Total Scanned RFID, then the RFID will move up to Total Assigned RFID, until the number is same as the plan.
- Then tap on [Confirm] to show whether you want to update the item with assigned RFID in the issue plan. (Illustrator 6.2.4.d)
- then you can tap on [Previous] or [Next] move to another good which will be doing another RFID assignment.
- After all items are assigned RFID, the plan will be moved to Stock In. In Warehouse menu, tap on [Tagging].
- New receive plans will be listed in the RFID Assign window (Illustrator 6.2.4.a)
- tap on one record which needs to assign RFID to the item, then the second screen the item and its plan number will be showed. (Illustrator 6.2.4.a)
(in initiate, the Assigned is 0 which means no RFID was assign to any item; and Total Scanned RFID also is 0, because there is no RFID tag was detected)
- On the upper right corner, tap on [RFID] to start scan RFID, when RFID is detected, the number of RFID will be showed at Total Scanned RFID (Illustrator 6.2.4.b)
- Once the clerk tap on one RFID under Total Scanned RFID, then the RFID will move up to Total Assigned RFID, until the number is same as the plan.
- Then tap on [Confirm] to show whether you want to update the item with assigned RFID in the issue plan. (Illustrator 6.2.4.b)
- then you can tap on [Previous] or [Next] move to another good which will be doing another RFID assignment.
- After all items are assigned RFID, the plan will be moved to Stock In.
 Steps:
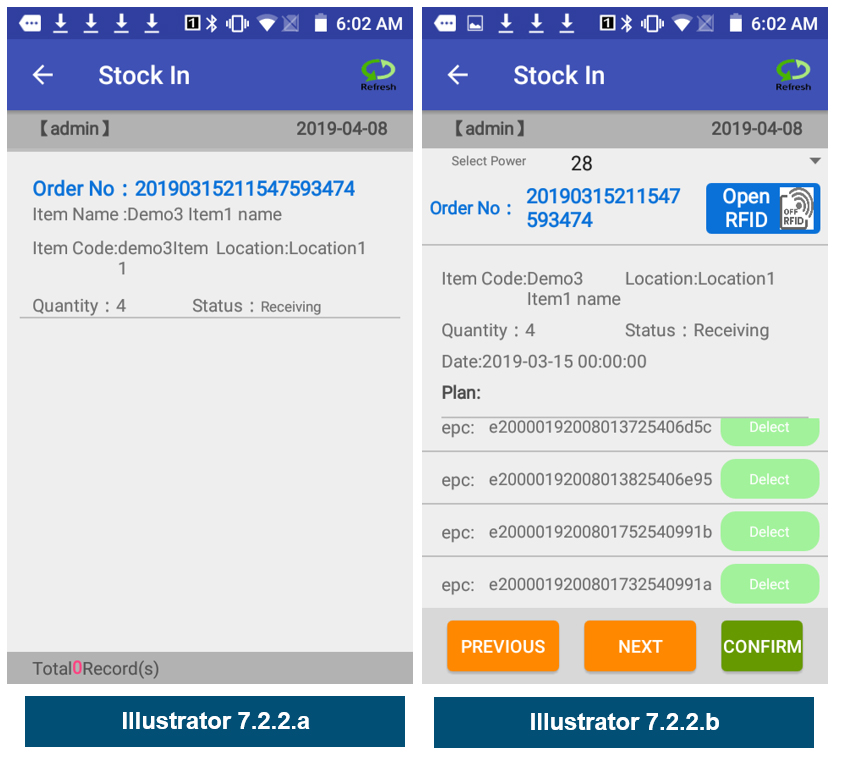
- In warehouse menu, tap on stock in.
- Planed and RFID assigned items will be showed for selection. (Illustrator 6.2.5.a)
- tap on one record, the second screen will be showed. (Illustrator 6.2.5.b)
- On the upper right corner, tap on [RFID] on
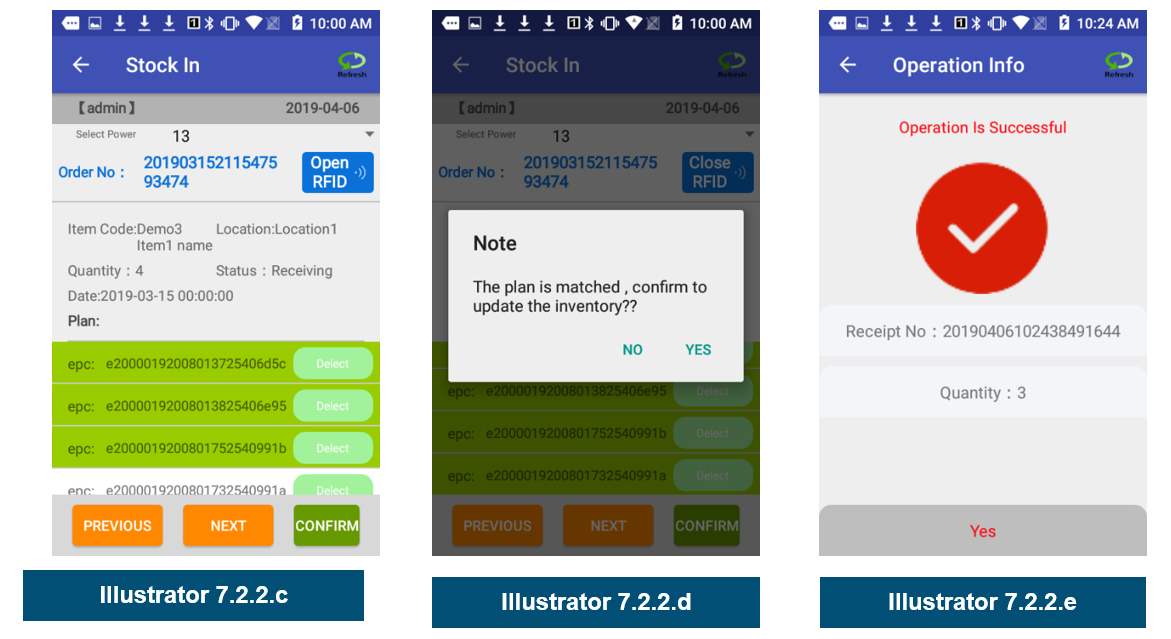
- The handheld will detect all RFID Tags to verify whether the item’s RFID tally with the assigned one. (Illustrator 6.2.5.c)
- if the Detect RFID less then the planed figure, then the application will wait to clerk choose to tap on [Confirm]
- Then the system will warning you that the number is tally to let you ignore or confirm to continue the stock in process, if you [Confirm] then the system will update the stock balance with partial of the plan. (Illustrator 6.2.5.d)
- If RFID are will matched with the plan, then the item background color will be change to green and pop up message will let you choose [Yes] to update the inventory or [Cancel] ignore the operation. (Illustrator 6.2.5.d)
- If you tap on Yes then system will update the inventory and show you a success window (Illustrator 6.2.5.e) to inform you.
- then you can tap on [Previous] or [Next] move to another product to update the inventory information use steps 3 to 7.
This function is a plan to Issue items.
The plan is generated in backend (Computer)
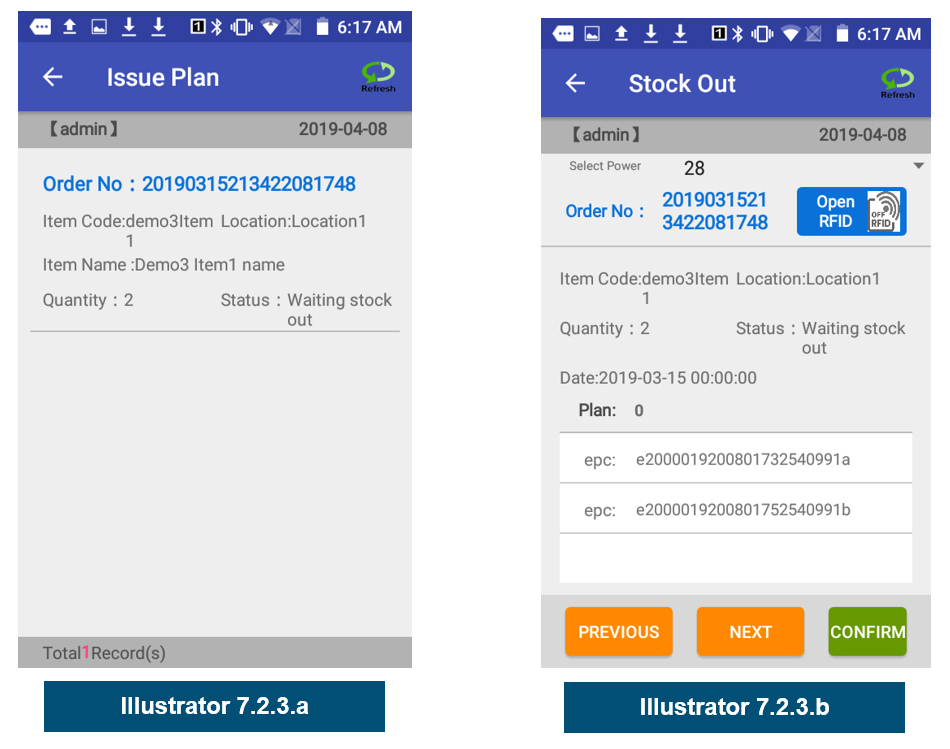
Steps:
- In warehouse menu, tap on stock out.
- The issue planning will be showed (Illustrator 6.2.7.a)
- tap on one planned item, then the second screen will be showed. (Illustrator 6.2.7.b)
- On the upper right corner, tap on [RFID]
- The handheld will detect all RFID Tags which will match the RFID tag in the plan.
- If only few items are tally with the plan, then tallied RFID’s back ground color will be changed into green, and let clerk to select the command [Confirm] to proceed, otherwise will wait to fully matched.
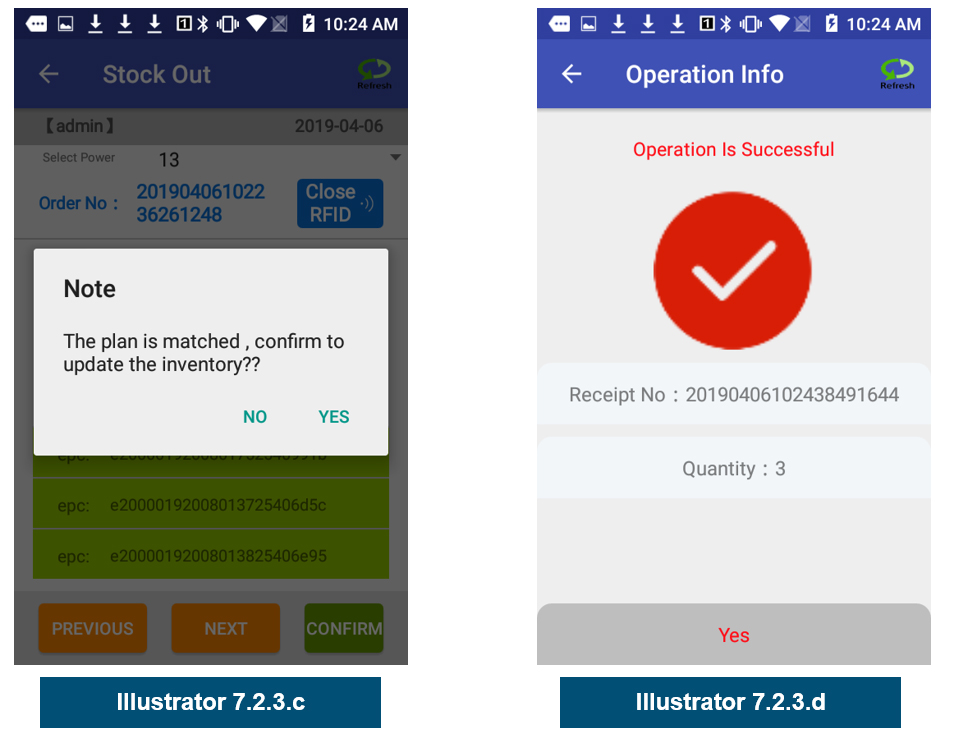
- if all detected RFID are fully matched with planned RFID, then planned items’ back ground color will be changed to green color and will pop up a note to inform clerk to proceed the stock out process. (Illustrator 6.2.7.c)
- after clerk confirm to tap on Yes, then the planned figure will be deducted in inventory and the balance will be update. The success window will be showed on screen. (Illustrator 6.2.7.d)
if you want to continue to do the stock out process, then you can tap on [Previous] or [Next] move to another plan and follow step 3 to step 6 again to stock out another plan out.
 Steps:
- In Shop and Office menu, tap on [Stock-Out].
- Then the screen will be launched (Illustrator 7.1.2.a)
- You can adjust the power to minimize the distance for detecting any RFID (there are 5 bands, 13 is the minimum, 33 is the maximum) the default value is 28, if you want to adjust, just click the pull down icon to choose any list number then the power will be pre-set.
- Once the RFID power is set to success the window will be showed (Illustrator 7.1.2.b)
- On the middle right command, tap on [RFID]
- The handheld will detect all RFID Tags which to be showed on the screen (Illustrator 7.1.2.c)
- If you want to re-scan the issue RFID items, tap on the left site command [Cleardata] then all detected RFID will be cleared, and you need to repeat the step 4-5 again to obtain the RFID tags which need to be issued.
- if all detected RFID are correct, you need to tap on Submit command to upload the RFID tags into backend system to update the inventory.
- Then the system will show a successful message in a new window (Illustrator 7.1.2.d)
- After tap on Yes, the stock out process will be finished with the inventory balance to be updated.
 Steps:
- In Shop and Office menu, tap on [Stock-Balance].
- Then the screen will be launched (Illustrator 7.2.5.a)
- You can tap on and hold to move up and down to check more RFID items.
- If you want to know the transaction details of any RFID item, please tap on any record in the Inventory Query screen, the system will lead a new screen to show all transaction belongs to the RFID Tag. (Illustrator 7.2.5.b)
 Steps:
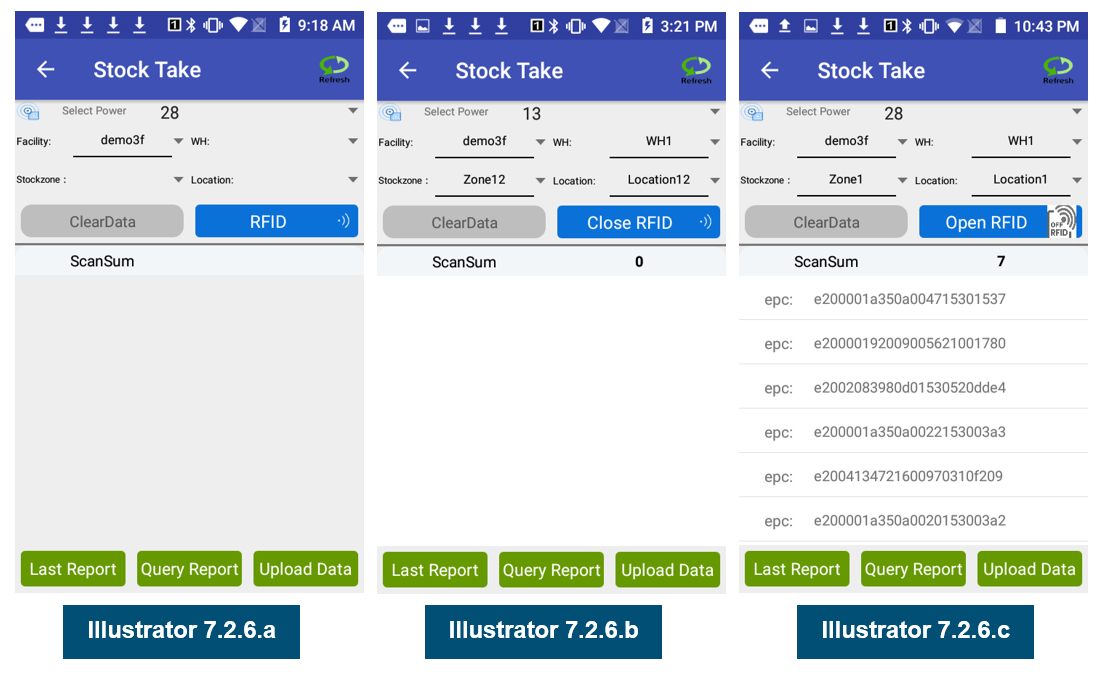
- In Shop and Office menu, tap on [Stock-take].
- Then the screen will be launched (Illustrator 7.2.6.a)
- You can adjust the power to minimize or maximum the distance for detecting any RFID (there are 5 bands, 13 is the minimum, 33 is the maximum), the default value is 28, if you want to adjust, just click the pull down icon to choose any list number then the power will be pre-set.
- After you have pre-set the RFID power, then you need to select the location where you need to do the stock take. (Illustrator 7.2.6.b)
- After you properly select the location, then you can switch on RFID to detect the RFID tags within the location. (Illustrator 7.2.6.c)
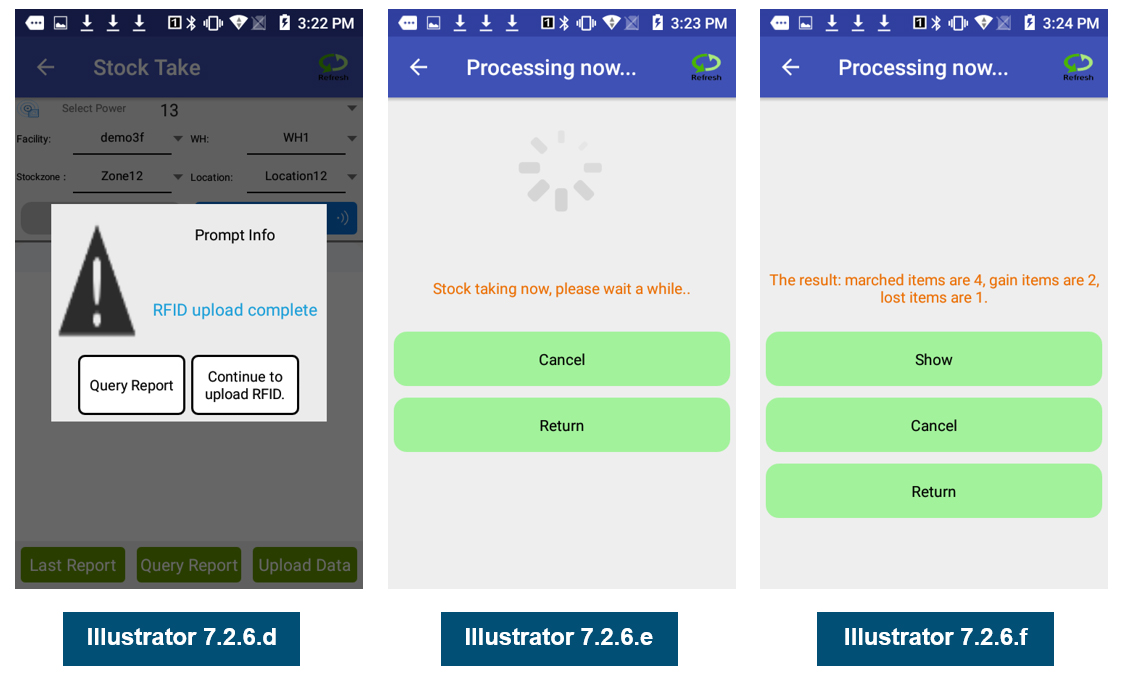
- If you think all of RFID items in the location have been already scanned, then tap on [Upload Data] to transmit these data into backend system to prepare the stock take report.
- If the RFID tags upload successful, then system will pop up and window which let you choose to generate the stock take report or do another round of RFID tags upload. (Illustrator 7.2.6.d)
- Once you tap on [Continue to Upload RFID] then you have to repeat steps 5 – 7 to upload all locations RFID into the system.
- If you tap on [Query Report], then system will start generating stock tack report for you. (Illustrator 7.2.6.e)
- This generating will consume some times depends on the network speed and the size of inventory , so please be patient to wait for the result.
- Once the system has finished the generation then will have a stock take report (Illustrator 7.2.6.f)
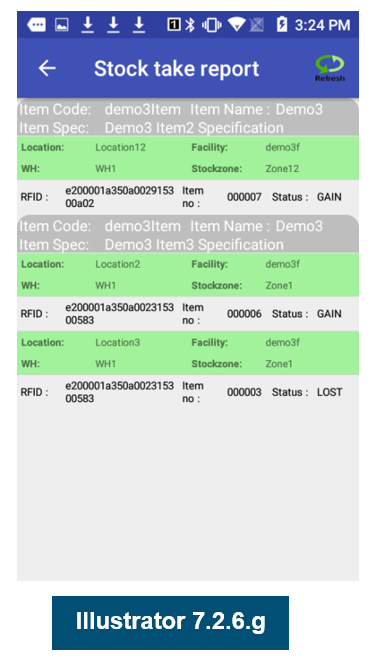
- You can read the report to see what is the item you gain or lost from this stock take, just click [Show], then the stock take report will be showed in details. (Illustrator 7.2.6.g)
 Steps:
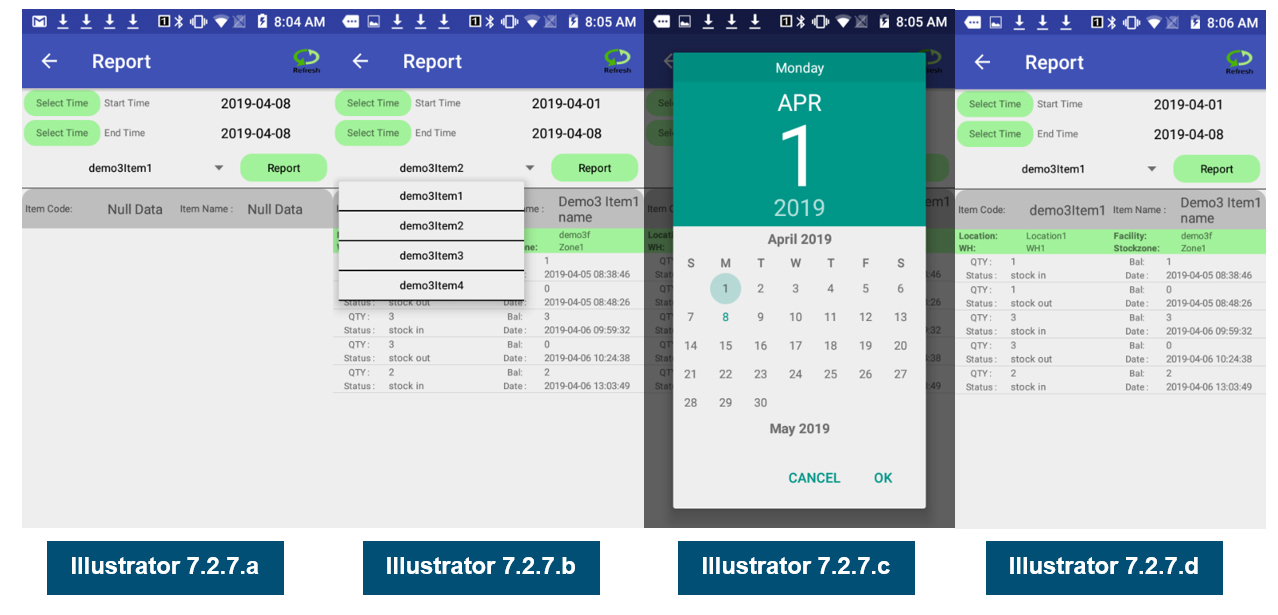
- In Warehouse menu, tap on [Transaction Report].
- Then the screen will be launched (Illustrator 7.2.7.a)
- Select an item which you want to generate the transaction report (Illustrator 7.2.7.b)
- Select an period when you want to generate the transaction report(Illustrator 7.2.7.c) after tap on OK, then you are ready to generate the transaction report.
- Tap on [Report], then the report will be generated. (Illustrator 7.2.7.d)
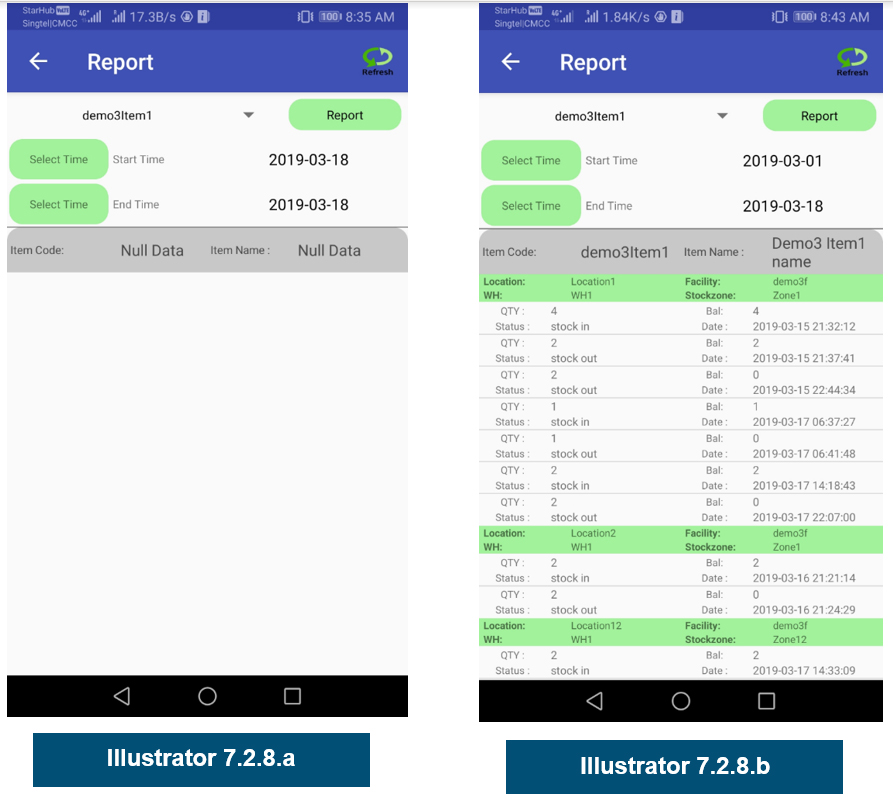 Steps:
- In Warehouse menu, tap on Daily Report
- Then the report screen will be launched (Illustrator 7.3.7.a)
- Choose an item and the start date as well as end date
- Tap on Report, then the report will be showed in the next window (Illustrator 7.3.7.b)
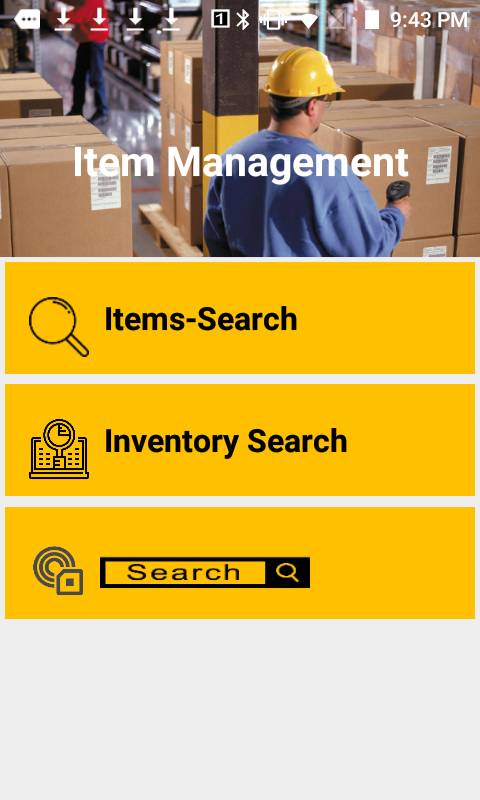
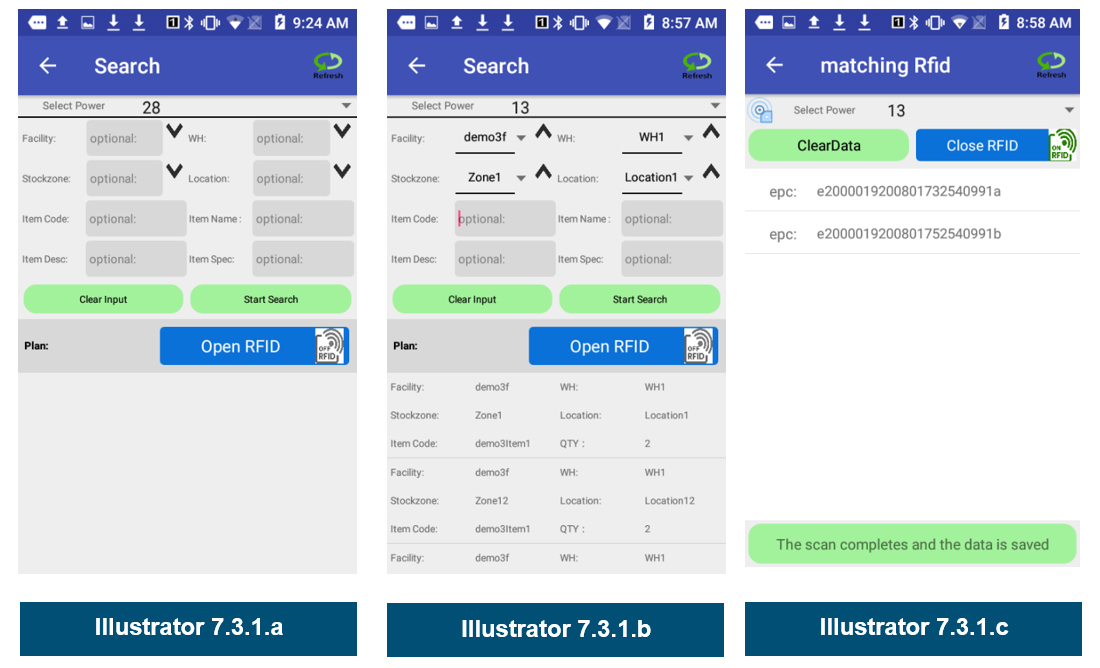
 Steps:
- In Item Management menu, tap on [Item Search].
- Then the screen will be launched (Illustrator 7.3.1.a)
- You need to select the location where you want to search a item(s) (Illustrator 7.3.1.b)
- After selected all locations, tap on [Start Search] then the items in the selected location will be showed on the screen (bottom part) (Illustrator 7.3.1.b)
- Selected one of the record which is listed in the searched result, then the selected items details will be showed in the window. (Illustrator 7.3.1.c)
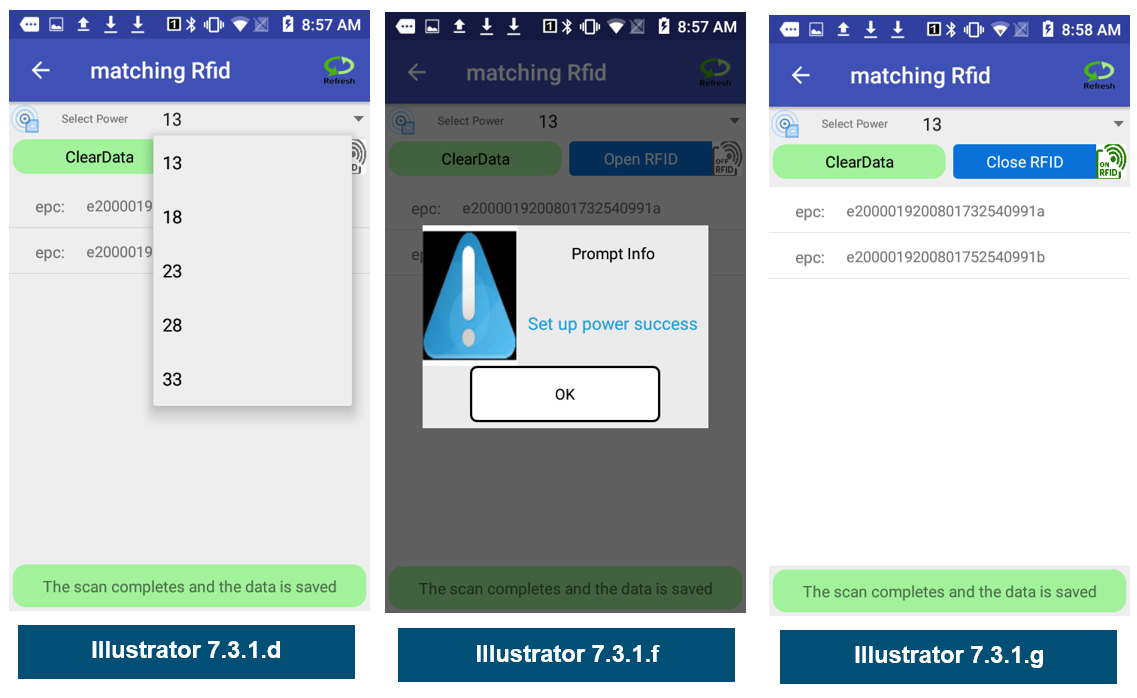
- You can adjust the power to suit the distance for detecting any RFID (there are 5 bands, 13 is the minimum, 33 is the maximum) the default value is 28, if you want to adjust, just click the pull down icon to choose any list number then the power will be pre-set. The successful info will be showed (Illustrator 7.3.1.d) and (Illustrator 7.3.1.f)
- After tap on [OK], then you can power on the RFID to start searching the item (Illustrator 7.3.1.g)
- End searching the item then tap on [Close RFID] then the RFID off status will be showed, if the item found, then you the record can be showed in green to inform you that the item has been found.
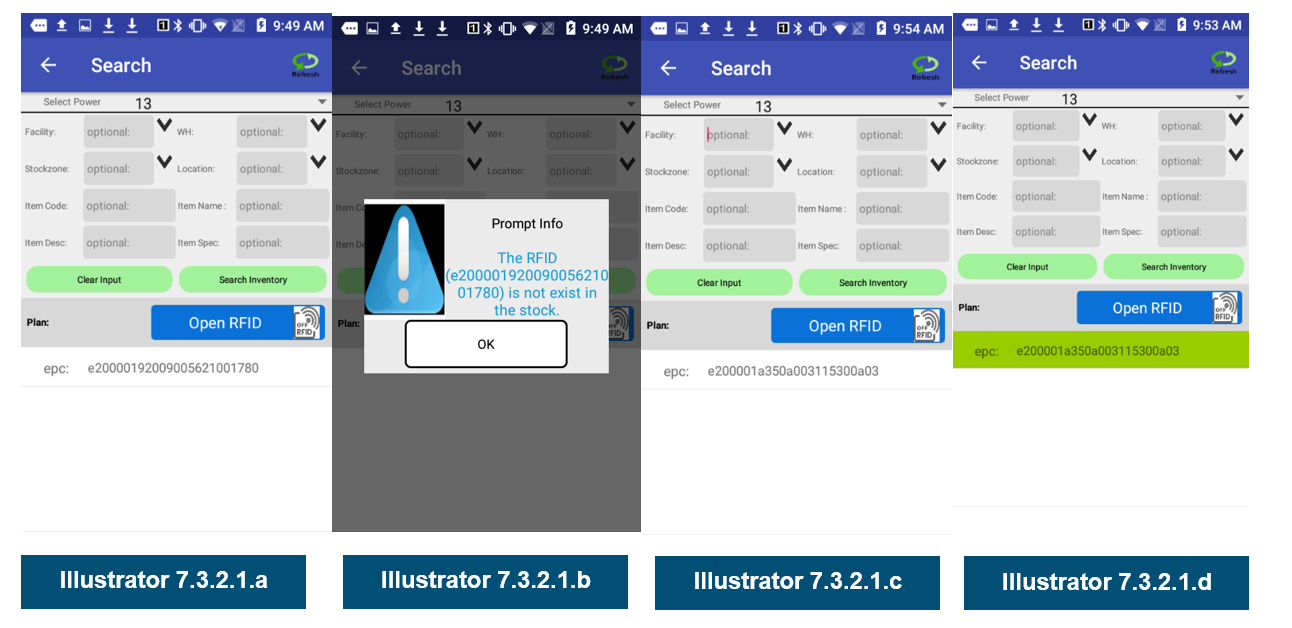 Steps:
- In Item Management menu, tap on [Inventory Search].
- Then the screen will be launched (Illustrator 7.3.1.a), (Illustrator 7.3.1.c)
- You need to select the location where you want to search a item(s) (Illustrator 7.3.1.b)
- After tap on [OK], then you can power on the RFID to start searching the item
- If the item is no inventory balance then the result will be showed as (Illustrator 7.3.1.b)
- If the item is in the stock, then the result will be showed (Illustrator 7.3.1.d)
 This function lets you key in an RFID in the box, then system will detect the RFID for you to see where it is located, the function will help you finding an item which is accidently attached a RFID in an item.
Steps:
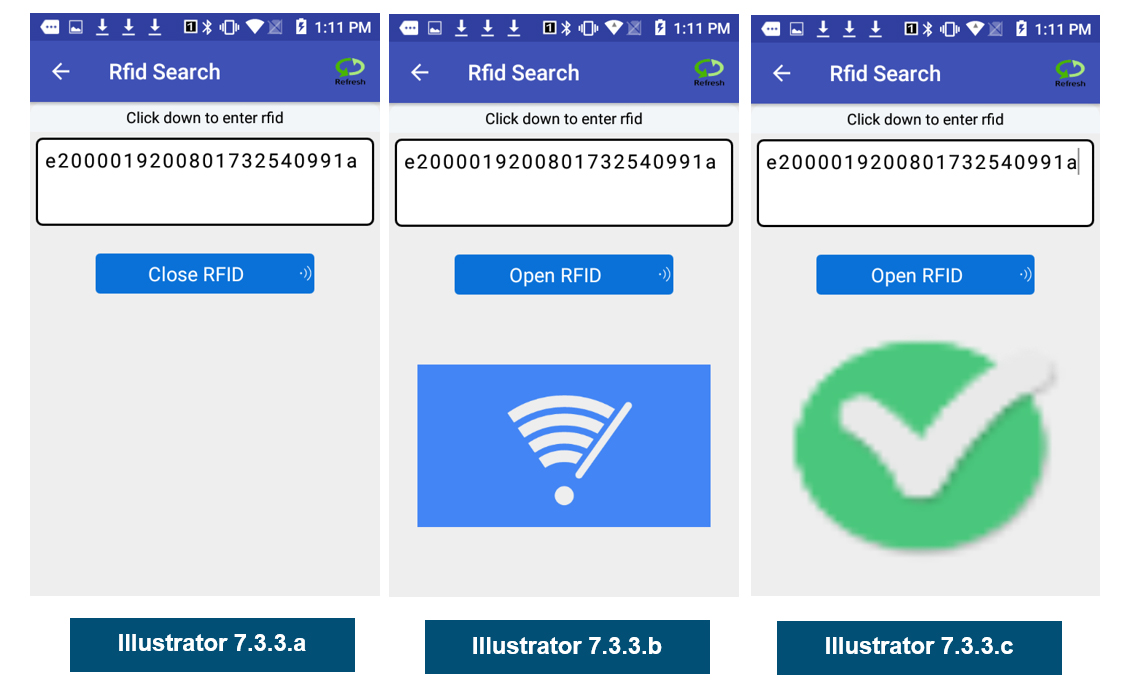
This function lets you key in an RFID in the box, then system will detect the RFID for you to see where it is located, the function will help you finding an item which is accidently attached a RFID in an item.
Steps:
- In Item Management menu, tap on [Search].
- Then the screen will be launched (Illustrator 7.3.3.a)
- You can adjust the power to suit the distance for detecting any RFID (there are 5 bands, 13 is the minimum, 33 is the maximum) the default value is 28, if you want to adjust, just click the pull down icon to choose any list number then the power will be pre-set
- After tap on [OK], then you can open the RFID to start searching the item
- If the item is found then the tick icon will be showed in green and the voice will be out to say “you have got it”.(Illustrator 7.3.3.c)
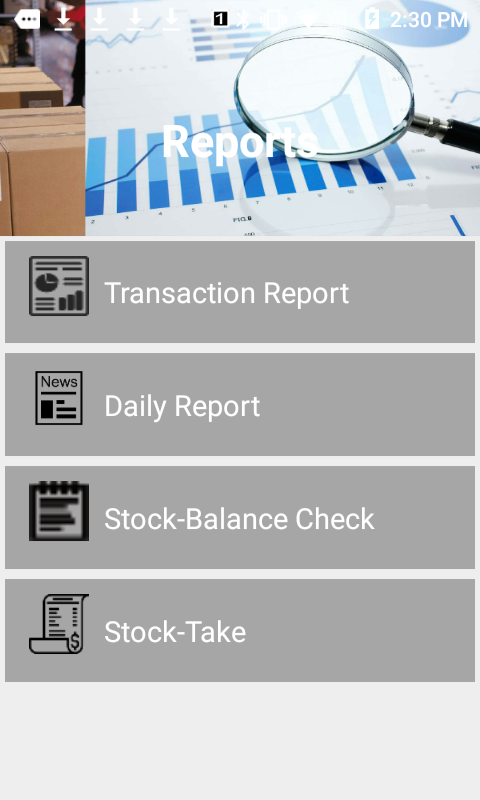 This menu will show you all reports, include Item Transaction Report, Daily Inventory Report, Stock Balance Report and Stock Take Report.
Same as 7.2.7
Same as 7.2.8
Same as 7.2.5